In this project, I will show you how to generate a PWM signal using 8051 Microcontroller and also a PWM based DC Motor Speed Control using Microcontroller.
Outline
ToggleIntroduction
It is important to control the speed of DC motor in many applications, where precision and protection are essential. Here we will use a technique called PWM (Pulse Width Modulation) to control the speed of DC motor.
We can achieve speed control of DC motor using mechanical or electrical techniques but they require large size hardware to implement but a Microcontroller based system provides an easy way to control the speed of DC motor.

Earlier, we have already seen how to control the speed of DC motor using PWM without Microcontroller. Here, we do the same experiment by using a microcontroller.
For that purpose, here we will use 8051 controller to produce PWM wave. By varying the width of this PWM wave, we can control the speed of DC motor. In 8051 microcontroller, the timers are used to generate the PWM wave.
In this article we will see how to generate a PWM Signal using timers in 8051 Mocrocontroller and also how to control the speed of DC motor using tthat PWM signal.
PWM Based DC Motor Speed Control using Microcontroller Circuit Principle
The heart of this project is the 8051 Microcontroller. If you have worked with any variant of the 8051 Microcontroller, you might remember that 8051 doesn’t have a dedicated PWM circuitry to enable PWM Mode. So, in order to generate a PWM Signal, we have make use of Timers and switch the I/O pins ON and OFF using the timers.
In this project, I will make use of Timer0 in 8051 Microcontroller along with Timer Interrupt to produce the PWM Signal.
Also Read the Related Post – How Stepper Motor Driver Circuit Works using 8051 Microcontroller?
How to Generate PWM in 8051 Microcontroller?
Most modern microcontrollers like AVR (Arduino, for example), ARM, PIC, etc. have a dedicated PWM hardware and pins to activate PWM mode instantly. However, 8051 Microcontrollers do not have this provision. So, how to generate PWM in 8051 Microcontroller?
For this we have to use Timers and Interrupts in 8051 Microcontroller. The Timer0 of 8051 is configured in Mode0. By carefully adjusting the High and Low levels, we can maintain a constant period of the signal.
Circuit Diagram of PWM Based DC Motor Speed Control using Microcontroller

Circuit Components
- 8051 Microcontroller
- 11.0592 MHz Crystal
- Capacitors – 33pF x 2, 10µF
- Resistors – 1KΩ x 4, 10KΩ x 2
- 12V DC motor
- L298N Motor Driver
- Push Buttons x 5
- 1KΩ x 8 Pull-up Resistor Pack
- Serial cable
- 12V battery or adaptor
- Connecting wires
PWM based DC Motor Speed Control using Microcontroller Circuit Design
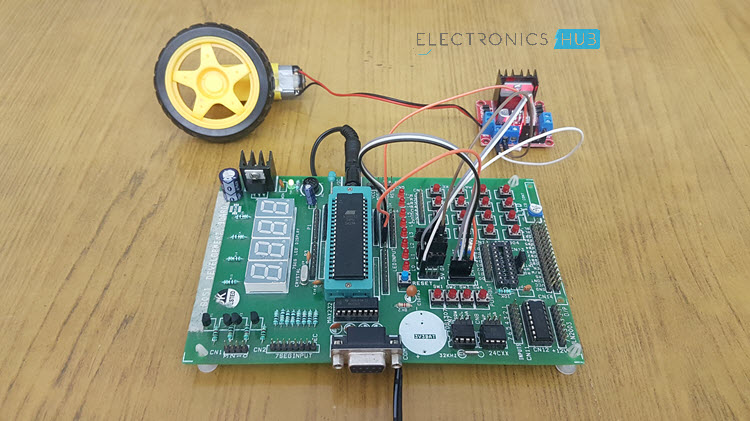
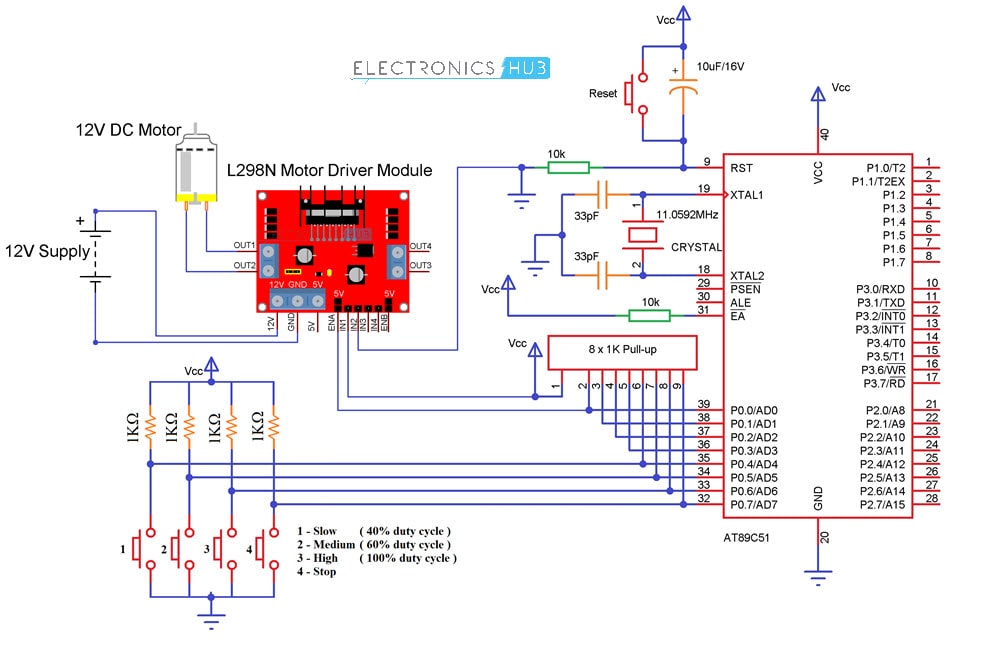
The circuit consists of one 8051 Microcontroller (and its supporting circuitry related to oscillator and reset), L298N Motor Driver Module, a DC Motor and a few push buttons.
A 12V DC Motor is connected to the L298N Motor Driver Module at its OUT1 and OUT2 Pins. The IN1 and IN2 pins of the motor driver are connected to +5V (VCC) and GND. The EN1 pin of the Motor driver is connected to Port0 Pin P0.0.
Four Push Buttons are connected to Port0 Pins P0.4, P0.5, P0.6 and P0.7.
Generally, we can interface switches to the micro controller in two configurations; one is Pull-up configuration and the other is pull-down configuration.
Pull-up configuration: In pull up configuration, the microcontroller pin is pulled HIGH to LOGIC 1 and the button is connected to GND. When button is pressed, microcontroller pin receives LOGIC 0
Pull-down configuration: In pull down configuration, the microcontroller pin pulled down to LOGIC 0 and the button is connected to VCC. When button is pressed, microcontroller pin receives LOGIC 1.
In our circuit we are using pull up configuration. So, we need to check for logic 0 in order to know whether the button is pressed or not.

Code
The code for the project is given below.
How to Operate the Circuit?
- Connect 12V battery or adaptor to the development board.
- Switch on the supply.
- Burn hex file to the 8051 controller with the help of programmer.
- Make the necessary connections as per the circuit diagram.
- Now switch on the supply and press switch 1. You can observe the starts rotating but at only 40% capacity.
- If you press switch 2, the motor runs with slightly greater than half the speed (60% duty cycle).
- Pressing switch 3 will make the motor to rotate at full speed (100% duty cycle).
- To stop the motor, press switch 4.
Advantages
- Using this PWM method, we can save the power.
Applications
- Used in industries to control the speed of motors.
- Used in shopping malls.
- We can use this concept to control the light intensity.

