Need to capture something on your Chromebook screen? Whether it’s a funny meme, a helpful webpage, or a specific error message, taking a screenshot is a breeze. This guide will walk you through a few easy methods for grabbing an image of your Chromebook display, all it takes is a quick key combination or a tap in the right spot! Let’s get started on preserving those pixels.
Outline
ToggleHow To Take A Screenshot On A Chromebook Using A Snipping Tool?
The snipping tool on your Chromebook allows you to capture specific parts of your screen. Here’s how you can use it:
1. Access the Snipping Tool:
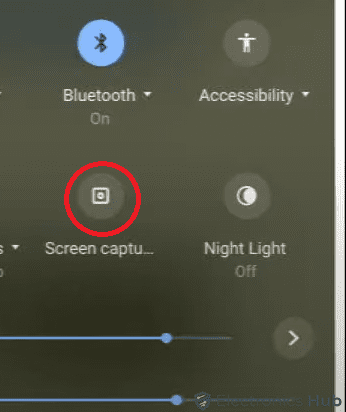
- Click on the section with the clock in the bottom right corner of your Chromebook desktop.
- In the Quick Settings panel, find and click on “Screen capture” to open the screen snipping tool.
Alternatively, to open the snipping tool on your keyboard, you can use a shortcut. Simply press Shift + Ctrl + Show Windows simultaneously. The Show Windows key is typically located as the fifth or sixth key in the top row, and it looks like a stack of rectangles. However, on some Chromebook keyboards, you might find the F5 key used instead of Show Windows.
2. Choose Capture Option:
Once the snipping tool is open, a menu will appear at the bottom of the screen. Choose the desired capture option:
- To capture a specific area, select “Partial screen screenshot,” drag to select the area, and then click “Capture.”
- To capture a specific window, choose “Specific window screenshot,” and the tool will automatically capture the window.
- To capture the entire screen, select “Full screenshot,” and the tool will capture everything.
That’s it! You’ve successfully captured a screenshot on your Chromebook using the snipping tool.
How To Take A Screenshot On A Chromebook Using Shortcut Keys?
Opening the snipping tool and capturing screenshots on a Chromebook can sometimes feel like a time-consuming process. However, using shortcut keys provides a quick and efficient alternative. Here’s how to take a screenshot on a Chromebook using shortcut keys:
- To capture the entire screen: Press “Ctrl + Show Windows”. This captures everything on your screen.
- To capture a specific area: Use “Ctrl + Shift + Show Windows”. A menu will appear at the bottom of your screen. Select “Take partial screenshot,” then click and drag to highlight the area you want to capture. Release the click, and your selected area is captured.
- To capture a specific window: Press “Ctrl + Alt + Show Windows”. This captures only the active window you’re currently working in.
How To Access Screenshots On A Chromebook?
After capturing a screenshot, it is automatically saved in the “Downloads” folder. Here’s how to access your screenshots:
- Open the Files app on your Chromebook. You can find it in the app launcher or on the bottom shelf.
- In the Files app, click on the “Downloads” folder on the left-hand side.
- In the “Downloads” folder, you’ll see your screenshots labeled with the date and time of capture.
- To view, edit, or share a screenshot, double-click on it. You can also right-click for more options like sharing via email or Google Drive.
However, If you need your latest screenshots fast, press Search + V to see them in the Clipboard. It keeps track of your last five items. You can also find recent screenshots in a place called Tote. Click the Tote button on the shelf to get there.
Screenshot On A Chromebook – FAQs
Ans: Screenshots are typically stored in the Downloads folder within the Files app on your Chromebook.
Ans: No, you do not need to install any additional software. Chromebooks come with built-in features for taking screenshots using keyboard shortcuts or the snipping tool.
Ans: By default, screenshots are saved in PNG format on a Chromebook. However, you can use image editing software to convert them to other formats if needed.
Ans: Yes, Chromebooks come with built-in image editing tools that allow you to edit screenshots.
Conclusion
Capturing screenshots on a Chromebook is a breeze! Whether you prefer a quick keyboard shortcut or a visual menu selection via Quick Settings, there’s a method that perfectly suits your workflow. Remember, screenshots are saved in your Downloads folder, so you can easily access and edit them later. So next time you need to capture something on your Chromebook screen, don’t hesitate to use these handy methods!


