As a frequent Google Chrome user, you may have faced the annoying “Not Enough Memory” error at some point. This error notice may be a major hassle if you’re trying to access certain websites or apps. Getting a grasp on memory management and fixing errors is crucial to tweaking Chrome’s performance.
In this comprehensive guide, we will show you how to fix the “Not Enough Memory” error in Google Chrome so that you can surf the web seamlessly. Before digging into the fixing process, first, let’s understand this error in Google Chrome.
Outline
Toggle- Understanding the “Not Enough Memory” Error in Google Chrome
- How to Check your Computer’s available Memory?
- How to Fix the “Not Enough Memory” Error in Google Chrome?
- Advanced Tips for Optimizing Memory Usage in Google Chrome
- Troubleshooting Steps for Persistent Memory Issues
- Frequently Asked Questions
- Conclusion
Understanding the “Not Enough Memory” Error in Google Chrome
The “Not Enough Memory” error in Google Chrome pops up when the browser struggles to allocate enough Random Access Memory (RAM) to function properly. Essentially, Chrome relies on RAM (the computer’s short-term memory) heavily to run multiple tabs, extensions, and complex web pages.
Moreover, this error can occur due to various other factors like limited physical memory, excessive memory usage by Chrome extensions and plugins, outdated browser versions, and misconfigured virtual memory settings.
Here’s why you can get this error:
- Limited Physical Memory: If your computer has insufficient RAM (Random Access Memory), it can contribute to the “Not Enough Memory” error. This error may occur when Chrome and other apps use more memory than your machine can handle.
- RAM Overload: Chrome extensions and plugins may eat up a lot of memory. If you run many extensions or plugins at the same time, it can lead to memory overload and trigger the “Not Enough Memory” error.
- Outdated Browser Versions: Using an outdated version of Google Chrome may trigger memory-related issues. Updating your browser to the most recent version can help you overcome compatibility issues and improve memory use.
- Cache and Cookie Clutter: Over time, Chrome stores temporary data like cached webpage files and cookies. Though this data allows websites to load quicker on later visits, a crowded cache can consume significant RAM.
- Inefficient Extensions: Some extensions, especially those with complex functionality or those run continuously in the background, may use a lot of memory.
How to Check your Computer’s available Memory?
It is essential to assess your computer’s available memory. This will help you figure out the extent of the memory problems and guide you in implementing the best solutions.
For Windows
Here are two main ways to check available memory on Windows.
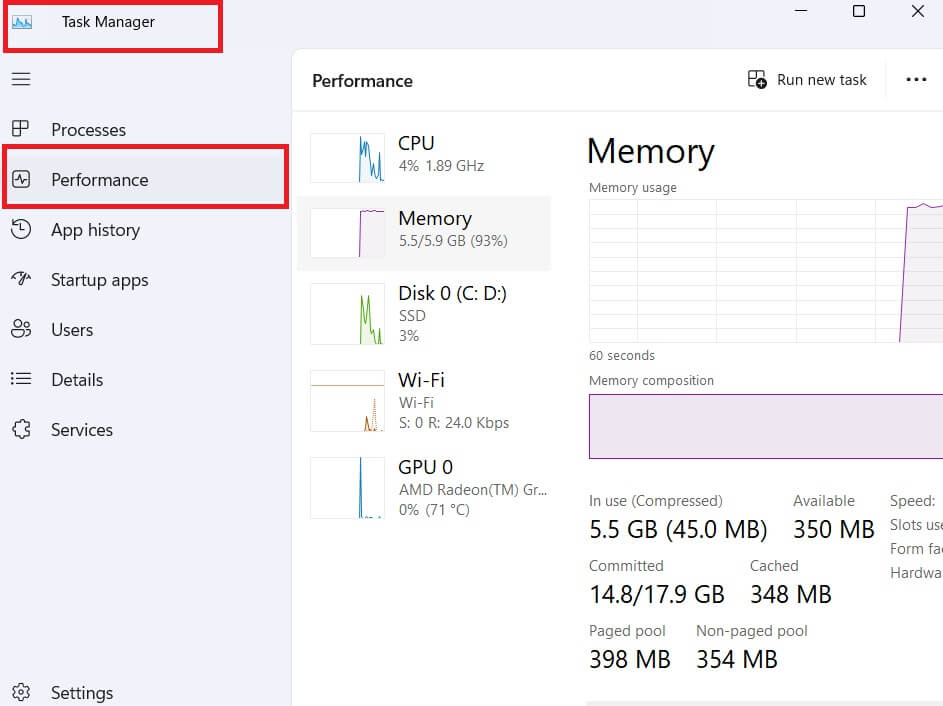
Task Manager
1. First Press Ctrl + Shift + Esc to open Task Manager.
2. Then Click on the “Performance” tab.
3. Under “Memory,” you’ll see a breakdown of your total RAM, used memory, and available memory.
System Information
1. Search for “System Information” in the Start menu and open the application.
2. Look for the line labeled “Available Physical Memory”. This shows the amount of RAM that’s not currently in use.
For Mac
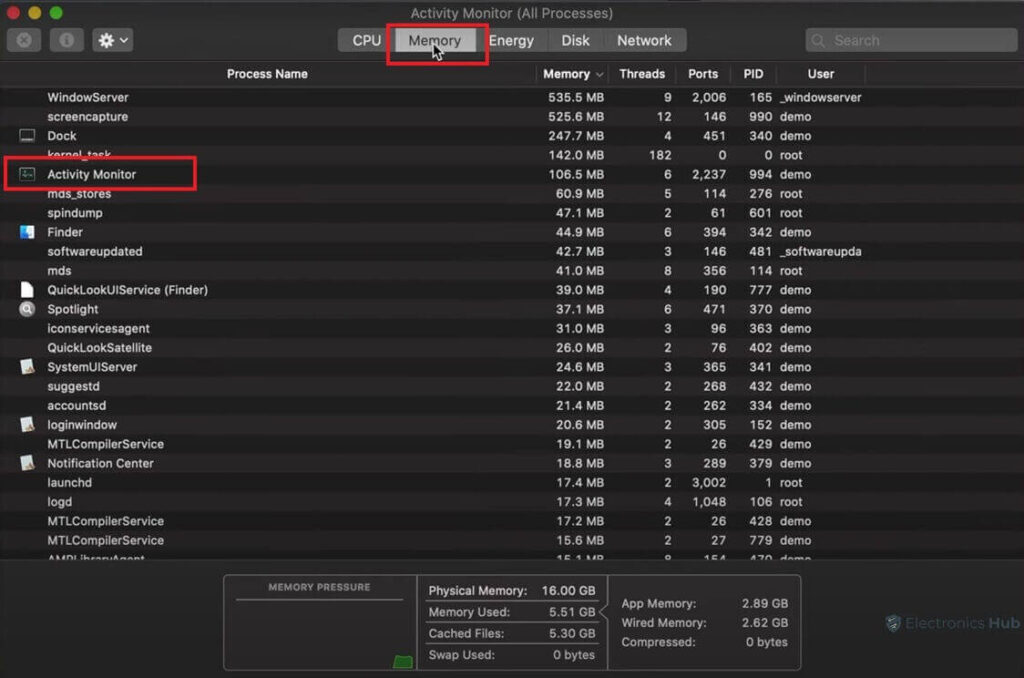
On Mac, you can check available memory using Activity Monitor:
1. Open Spotlight Search (magnifying glass icon in the top right corner) and type “Activity Monitor.”
2. Click on the “Memory” tab.
3. Look at the top bar; it displays the total memory, used memory, and available memory.
For Linux
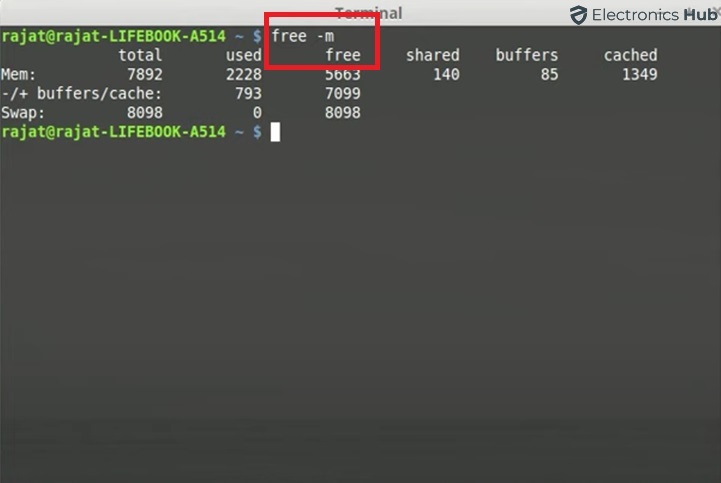
There are various commands you can use in Linux to check memory usage. Here is the common option:
1. Open a terminal window.
2. Type free -m and press Enter.
3. This command displays information about your total memory, used memory, and available memory, all in megabytes (MB).
Now that you have a good understanding of the “Not Enough Memory” problem and also checked your computer’s available memory, follow these step-by-step instructions to resolve this issue with Google Chrome.
How to Fix the “Not Enough Memory” Error in Google Chrome?
Follow these step-by-step instructions to resolve the “Not Enough Memory” error in Google Chrome.
Step 1: Clear cache and cookies
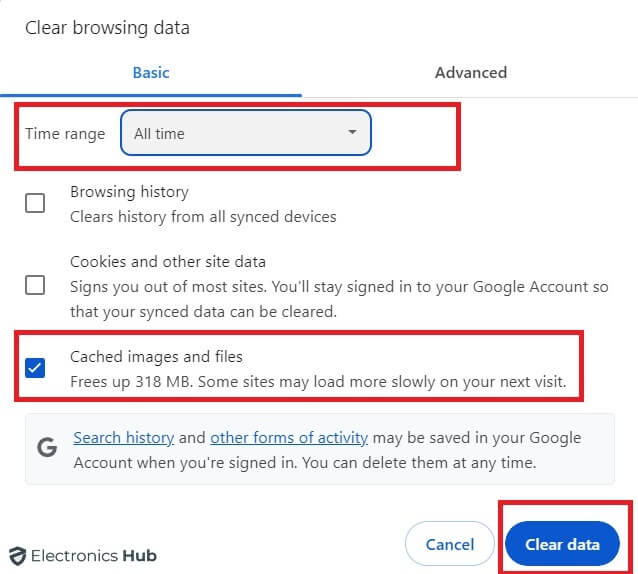
Think of your Chrome cache as a short-term memory. It stores bits of websites you’ve visited recently, like images and scripts, to help them load faster on your next visit. Cookies, on the other hand, hold site-specific data like login information. Though both can be helpful, a cluttered cache and overflowing cookies can eat up memory.
Here’s how to clear them:
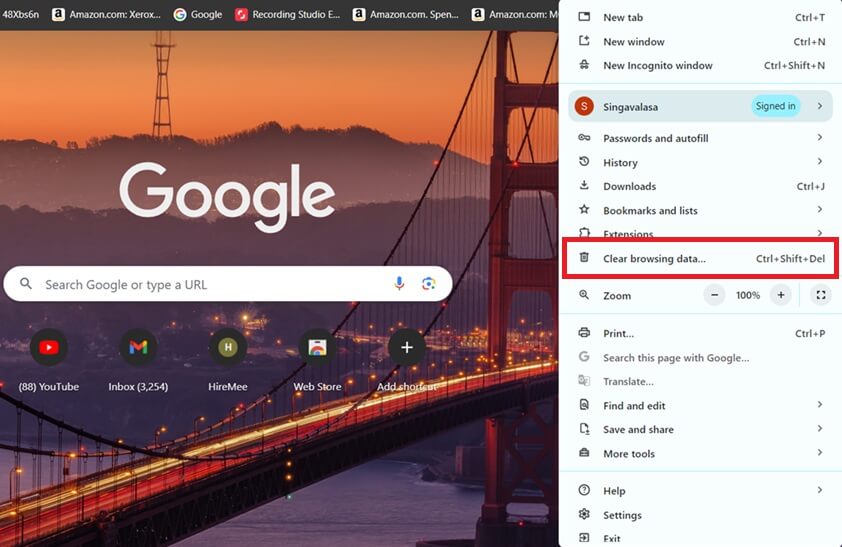
1. Open Chrome and click the three vertical dots in the top right corner.
2. Select “Clear browsing data.” from the menu.
3. Choose the time range (e.g., “All time”) and select “Cached images and files” and “Cookies and other site data.”
4. Click “Clear data.”
Remember clearing cache and cookies regularly can significantly improve Chrome’s performance.
Step 2: Disable unnecessary extensions and plugins
Those handy extensions and plug-ins you love can be memory hogs. Each extension running in the background consumes resources. While some are essential, others might be silently draining your memory.
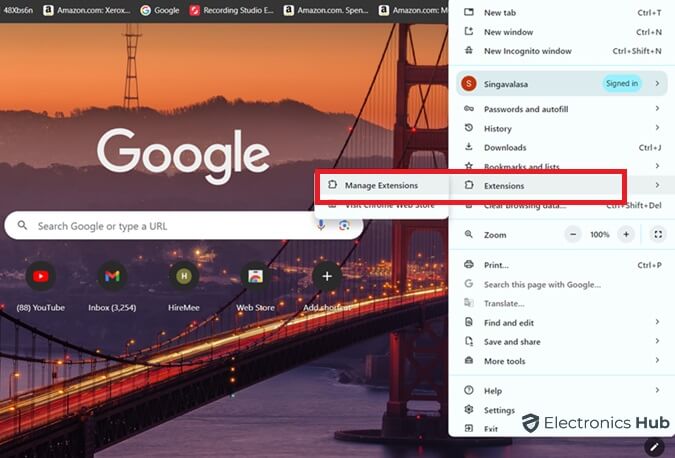
Here’s how to manage them:
1. Go to Chrome settings (three dots > Settings).
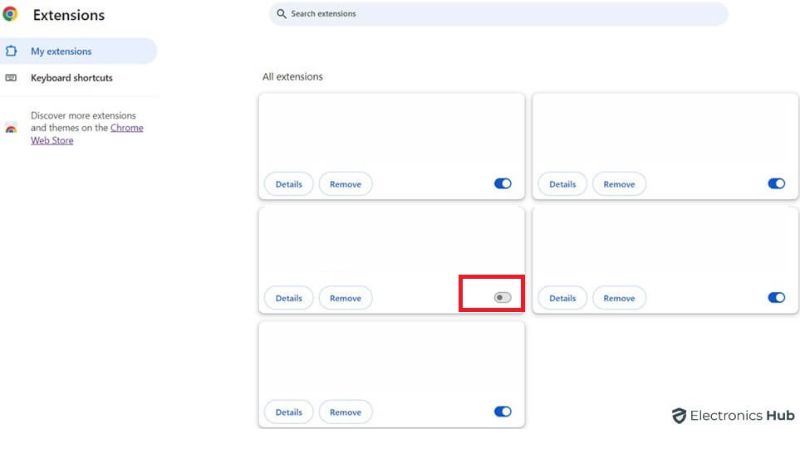
2. Click on “Extensions.”
3. Toggle off extensions you don’t use regularly. Consider removing unused ones altogether.
4. To manage plugins, type “chrome://plugins” in the address bar and press Enter.
5. In the “Plugins” page, disable any unnecessary plugins by clicking on the “Disable” button next to each plugin.
Step 3: Update Chrome
Keeping Chrome updated is crucial. New updates often include bug fixes and performance improvements, including memory optimization.
Here’s how to check for updates:
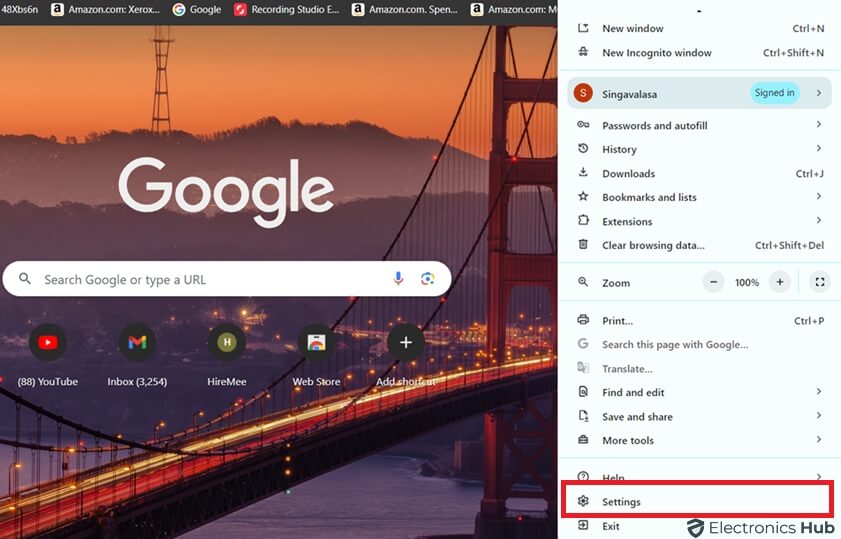
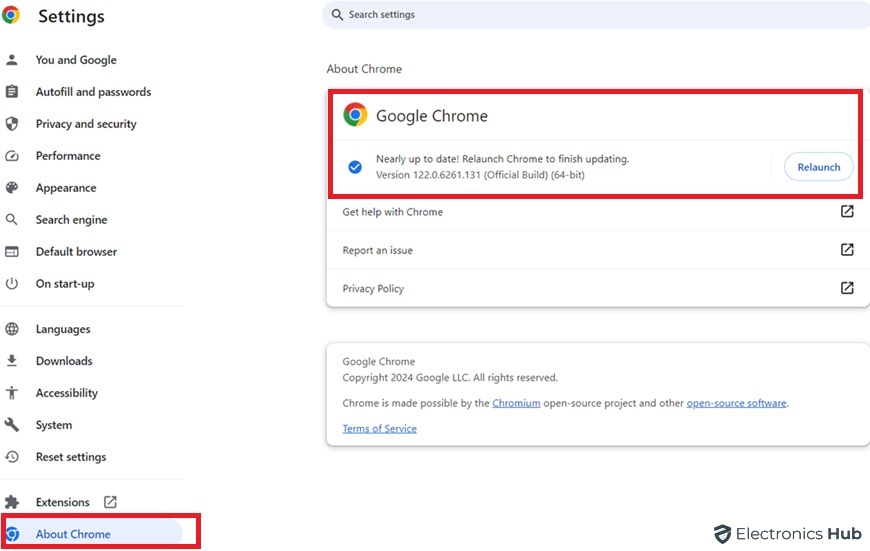
1. Click the three dots and go to “Settings.”
2. Click “About Chrome” in the left menu.
3. Chrome will automatically check for updates and install them if available.
4. Restart your browser after the update process completes.
Step 4: Adjust Chrome settings
Chrome offers settings you can tweak to optimize memory usage. One such option is “Memory Saver mode.” It helps to free up memory by discarding inactive tabs.
Here’s how to find it:
1. Go to Chrome settings (three dots > Settings).
2. Search for “Memory Saver” in the settings bar.
3. Enable “Memory Saver” if desired.
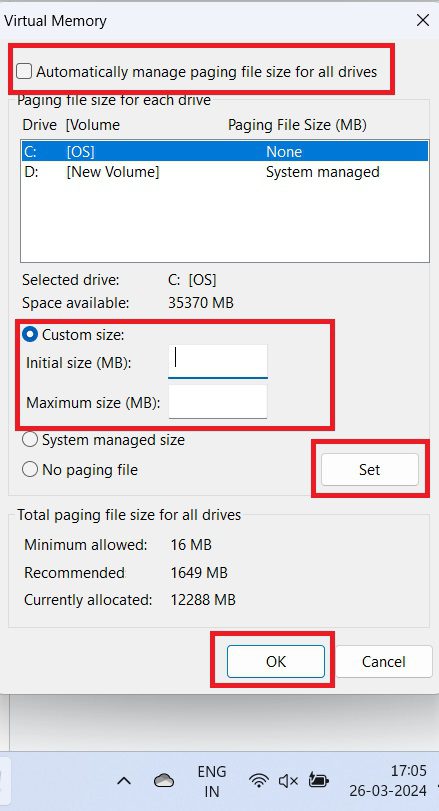
Step 5: Adjust virtual memory settings
Virtual memory settings control the allocation of additional memory space on your computer’s hard drive. Adjusting these settings can help resolve memory-related issues.
Here is how to adjust them:
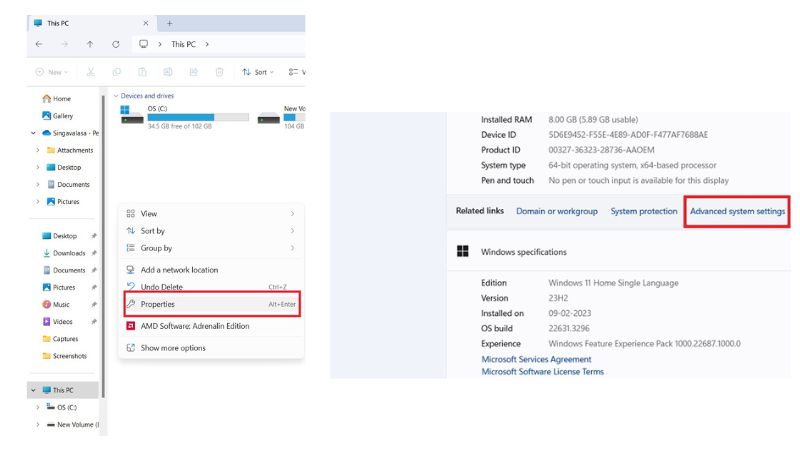
1. Right-click on the “This PC” or “My Computer” icon on your desktop.
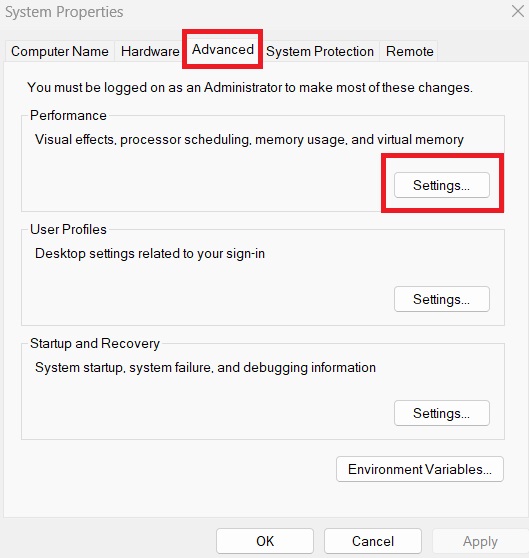
2. Select “Properties” and go to the “Advanced” tab.
3. And click on the “Settings” button under the “Performance” section.
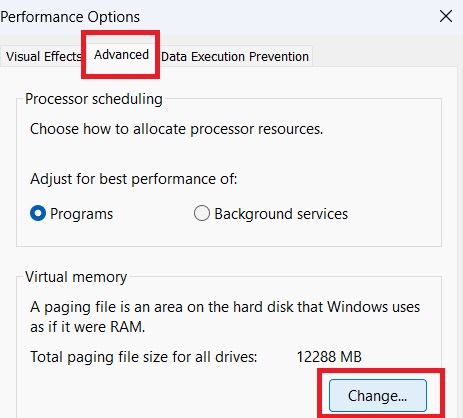
4. In the Performance Options window, navigate to the “Advanced” tab.
5. Click on the “Change” button under the “Virtual memory” section.
6. Uncheck the option that says “Automatically manage paging file size for all drives.”
7. Select the “Custom size” option and enter an initial and maximum size for the virtual memory.
8. Click on the “Set” button and then “OK” to save the changes.
Step 6: Close unnecessary tabs and applications
Having too many open tabs and programs might eat a lot of memory. Closing unneeded tabs and programs can help free up memory and fix the “Not Enough Memory” problem. Close any tabs and programs that are not currently in use to save memory.
Resources to monitor and manage memory usage
There are several tools and resources available to help you monitor and control memory use in Google Chrome. Here are some recommended choices:
- Chrome Task Manager: As previously stated, the Chrome Task Manager gives useful information on memory usage by specific tabs, extensions, and plugins. It can be accessed by hitting “Shift + Esc” in Chrome.
- Chrome Cleanup Tool: Google offers a Chrome Cleanup Tool that detects and removes unnecessary apps that create memory issues. You can download the tool from the Chrome Help Center website.
Advanced Tips for Optimizing Memory Usage in Google Chrome
It’s always beneficial to take more steps to optimize memory use in Google Chrome when fixing the “Not Enough Memory” error. Here are some advanced tips.
- Use Chrome’s Task Manager: Press “Shift + Esc” to open the Chrome Task Manager. It provides detailed memory usage statistics for individual tabs, extensions, and plugins. You can identify memory-consuming elements and disable or close them as needed.
- Limit the Number of Open Tabs: Keeping many tabs open simultaneously can strain your computer’s memory. Try to limit the number of tabs you have open. Also, use bookmarking or tab-suspending extensions to manage your tabs efficiently.
- Disable Unnecessary Chrome Features: Chrome includes features such as hardware acceleration, prediction services, and background services that use memory. Disable any features that you don’t require in Chrome settings.
Troubleshooting Steps for Persistent Memory Issues
If you still experience memory-related issues after executing the steps listed above, consider the following troubleshooting measures:
- Scan for Malware: Malware may trigger memory issues. Scan your computer with reputable antivirus software to identify and remove malware problems.
- Update Device Drivers: Outdated device drivers may lead to memory problems. Make sure you update your drivers to the most latest versions by visiting the manufacturer’s website or using driver update software.
Frequently Asked Questions
Ans: In rare cases, upgrades may cause compatibility issues with specific extensions or websites. However, the benefits of better performance and security upgrades greatly exceed the drawbacks.
Ans: If you’re a multitasker, consider upgrading your computer’s RAM. This is a permanent solution but might require technical expertise or consulting a computer technician for assistance.
Ans: There’s no one-size-fits-all answer. If you browse frequently and visit a lot of websites, clear them every week or two. If you’re a casual user, once a month might suffice.
Ans: If the problem remains after carrying out the above steps, it might be a bigger problem with your computer’s RAM or the Chrome installation itself. If everything else fails, restart your computer or reinstall Chrome. You can also check your computer’s activity monitor to determine if any other apps are using excessive RAM.
Conclusion
To wrap up, by following the aforementioned steps, you can drastically reduce Chrome’s memory use and reinstate a smooth surfing experience.
Remember that frequent maintenance of your Chrome settings is key to optimal performance. Don’t let memory problems slow you down! Take control over Chrome and enjoy a faster more responsive experience.

