Modern operating systems use system interrupts to allocate CPU access time to different hardware and software components. While system interrupts run smoothly in the background, they can occasionally cause problems. For instance, high CPU usage by system interrupts often indicates a hardware issue. Faulty drivers, incompatible devices, or hardware failures can cause these problems. Experiencing 100% CPU usage due to system interrupts can frustrate any Windows user.
In this guide, we will understand the importance of system interrupts in Windows, see the reasons for system interrupts causing 100% CPU usage, and also how to resolve or fix system interrupts 100% CPU usage.
Outline
Toggle- What are System Interrupts in Windows?
- What are the Reasons for System Interrupts 100% CPU Usage?
- What is the System Interrupts Issue?
- How to Fix System Interrupts 100% CPU Usage?
- 1. Basic Fixes
- 2. Remove/Disable your External Devices
- 3. Check all Hardware Drivers
- 4. Check Hardware Failures
- 5. Disable Internal Devices
- 6. Exclude Any Failing Hardware
- 7. Try Disabling Sound Effects/Enhancements
- 8. Update the BIOS to the Latest Version
- 9. Update Device Driver
- 10. Disable USB Root Hub
- 11. End the Process Causing High CPU Usage
- 12. End Unnecessary Background Processes
- 13. Manage Startup Programs
- 14. Disable Windows Fast Startup
- 15. Adjust Power Options
- 16. Repair Corrupted System Files
- 17. Disable High Precision Event Timer
- 18. Reset Windows
- 19. Reinstall Windows
- Frequently Asked Questions
- Conclusion
What are System Interrupts in Windows?
System interrupts are an essential component of the Windows OS. They act as a communication channel between hardware and software. Essentially, system interrupts signal the CPU that an event needs immediate attention. These events often involve hardware devices, such as a mouse or keyboard. When these devices require CPU resources, they generate an interrupt request.
The CPU constantly checks for these interrupt requests. When an interrupt occurs, the CPU pauses its current tasks. It then addresses the event that triggered the interrupt. After handling the interrupt, the CPU resumes its previous tasks.
There are two main types of interrupts: hardware interrupts and software interrupts. Hardware interrupts originate from physical devices. For example, when you press a key on the keyboard, it generates a hardware interrupt. On the other hand, software interrupts come from running programs (system calls, exceptions, or traps). These interrupts signal that a software process requires CPU attention.
What are the Reasons for System Interrupts 100% CPU Usage?
Are you facing 100% CPU usage due to system interrupts? Let us take a look at some possible reasons that causes this issue.
Faulty Hardware Components
One of the primary causes of high CPU usage due to system interrupts involves faulty hardware components. For instance, a failing network card can create excessive interrupt requests. When a network card malfunctions, it might continuously send signals to the CPU. This constant communication overloads the CPU, leading to 100% usage.
Peripheral Device Issues
A PC has a lot of peripheral devices and if there is an issue with even one of them, it can contribute to high CPU usage. Malfunctioning USB devices frequently cause high interrupt rates. For example, a faulty mouse or keyboard can continuously send interrupts. As a result, the CPU has to handle these requests constantly.
Outdated or Corrupted Drivers
Driver problems play a significant role in causing high CPU usage due to interrupts. Especially, outdated or corrupted drivers can lead to inefficient communication between the hardware and the operating system.
When drivers do not function correctly, the CPU may receive frequent interrupt signals.
Conflicts Between Drivers
When multiple drivers attempt to manage the same device, it can lead of conflicts between drivers. If the device needs CPU access, conflicted drivers may generate excessive interrupts.
This creates confusion for the CPU, which struggles to process the conflicting requests that can dramatically cause high CPU usage.
Malware
Security threats, viruses, or malware can frequently contribute to high CPU usage due to system interrupts. These components actively utilize CPU resources to execute malicious tasks. These processes can generate a high volume of interrupts, causing the CPU to run at full capacity.
Security Software
Even antivirus or similar security software can cause high interrupt requests. Some antivirus and firewall programs generate frequent interrupts as they scan files and network traffic. This activity can lead to increased CPU usage, especially on systems with limited resources.
Misconfigured Settings
Incorrect settings in the BIOS or operating system can create unnecessary interrupt requests. For instance, enabling legacy USB support may result in higher CPU usage than necessary.
Power Management Settings
Improper power settings can cause the CPU to operate inefficiently. For example, a power-saving mode may limit the CPU’s ability to handle interrupts effectively. Users should configure power settings based on their specific use cases.
What is the System Interrupts Issue?
Before we go ahead and take a deeper look at the possible fixes for the system interrupts 100% CPU usage issue, let’s learn a bit more about the system interrupts service and the issue caused by it. System interrupts is an inbuilt Windows service running in the background at all times in most computers.
It is designed to check the CPU interrupts caused by other background programs and services on your computer, which happen on a lower system level. Even though this Windows service is essential for detecting CPU errors and interrupts, it can also cause high CPU usage on its own in some cases.
How to Fix System Interrupts 100% CPU Usage?
Typically, the CPU utilization of System Interrupts in a Windows machines hovers between 0.1 and 5%. There is no need for caution even if the CPU usage due to System Interrupts reaches 10% as long it is momentary. However, if the CPU usage stays between 7 and 10% prolonged period, then there is definitely an underlying hardware issue.
1. Basic Fixes
Let us start with some basic fixes that can bring the CPU usage of System Interrupts to an acceptable level.
- Reboot/Restart Your System: This is not a joke but many PC-related issues can be resolved with a simple reboot. Save all your work, restart your PC, and see if it fixed the issue.
- Update Windows: If your PC has any pending updates from Windows, try to install them. Windows update often fixes issues with the operating system as well as some basic hardware components.
- Scan For Virus/Malware: If you are using Windows Security, then perform a full scan of the system. Alternatively, if your PC has a third-party security utility (an Antivirus software), then scan the system for virus, malware, or anything malicious.
If these simple fixes did the job for you and resolved high CPU usage due to System Interrupts, then well and good. But sometimes the problem can be further away than simply restarting or scanning for virus.
2. Remove/Disable your External Devices
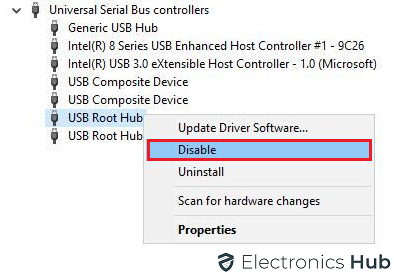
In most cases, the external devices connected to your computer send various signals and inputs to the CPU of your computer. Because of this, your computer’s processor can get overwhelmed and even possibly get high CPU usage issues from the system that interrupts Windows service itself. Thus, you can try removing or disabling all your external devices one by one. If you are not able to remove a certain external device due to some reason, you can disable it from the Device Manager as shown here:
- You have to first press Windows Key + X on your keyboard and select Device Manager from the list.
- Once you are inside Device Manager, expand the Universal Serial Bus controllers list to see all your external devices.
- Now, one by one, right-click on all of these external devices and select Disable, which will stop all inputs from them, possibly fixing the system interrupting 100% CPU usage.
3. Check all Hardware Drivers
As you would know, each and every hardware device connected to your computer has a driver. This driver is there to handle all the inputs and signals coming from your hardware devices which are meant to be sent to the CPU of your computer. But if the hardware driver itself is corrupted or outdated, it might not be working properly and causing issues like high CPU usage caused due to system interrupts.
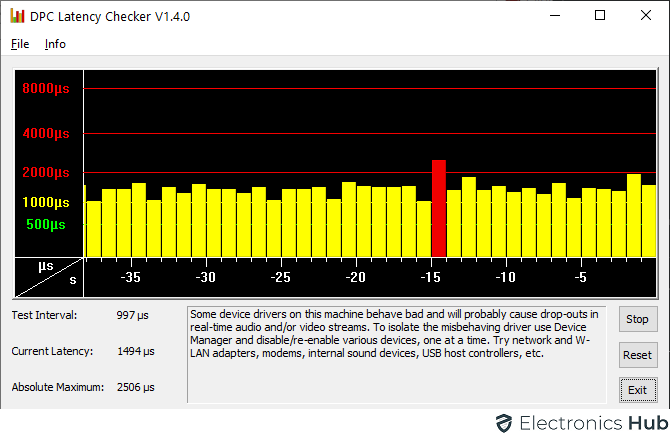
Thankfully, you do not have to manually check each and every hardware driver installed on your computer. Instead, you can simply install a program called DPC Latency Checker which will show you the latency of each hardware driver. And if you see abnormal latencies for any hardware drivers, you can simply update them from Device Manager quite easily.
4. Check Hardware Failures
Storage and Memory are the two important devices that constantly communicate with the CPU. If there is any kind of failure with either of these hardware, then there is a good chance that System Interrupts can increase the CPU Usage to 100%.
For hard disks and SSDs, you can use the Windows native tools such as CHKDSK, Error Checking Tool, and WMI (Windows Management Instrumentation).
- CHKDSK: Press Win + X, then select Command Prompt (Admin) or Windows PowerShell (Admin) to open Command Prompt as an administrator. Type the following command and press Enter: chkdsk C: /f /r (replace C: with the drive letter you want to check.)

- Error Checking Tool: Open File Explorer and right-click on the drive you want to check. Select Properties and go to the Tools tab. Under Error checking, click Check. Follow the prompts to scan the drive.

- WMI: Open Command Prompt. Enter the following command: wmic diskdrive get status. The output will show “OK” if the drive is functioning properly.

Alternatively, if you have access to any other S.M.A.R.T tool, then use it to look for issue with storage. CrystalDiskInfo is a free tool that provides detailed information about your hard drive, including temperature, health status, and SMART attributes.
Even for memory, Windows has a decent built-in program in the form of Windows Memory Diagnostic tool.
5. Disable Internal Devices
Other than the external devices connected to your computer, its internal devices and components can also cause issues related to the CPU. Similar to external devices, this is also caused due to the various inputs and signals sent by these devices to your CPU.
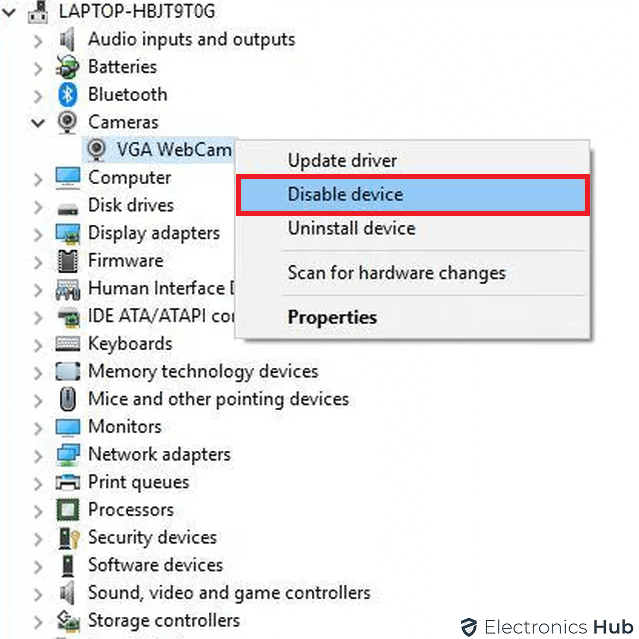
And as seen with external devices, you can easily disable internal devices from the Device Manager as shown earlier. Coming to the internal devices which you need to disable, which can be possibly causing the system interrupts 100% CPU usage, it can include the following internal devices:
- Network adapters and network cards
- Internal modems
- Sound devices and sound cards
- Add on expansion cards like TV tuner, DSL adapters, etc.
While disabling the internal devices of your computer, make sure that you are not disabling devices like the processor, memory, graphics card, and others. This is due to the reason that any of these are disabled, your computer may not function properly.
6. Exclude Any Failing Hardware
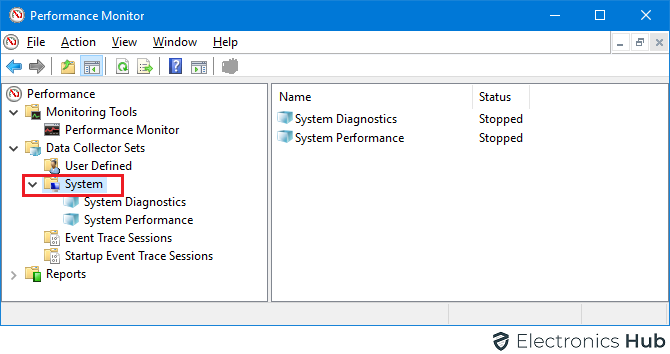
If you are using an old laptop or desktop, then it is highly likely that its internal components are not working properly anymore. And similar to corrupted external devices, such old and failing hardware can also cause the system to interrupt high CPU usage issue on your Windows PC. Fortunately, you can easily check if any of your computer hardware is failing or not by using a Windows utility called Performance Monitor as shown here:
- Use the Windows Search feature to open up the Performance Monitor on your computer.
- Here, go to Performance Monitor under the Performance and Monitoring Tools tab.
- Here, you can see a graph of every hardware component of your computer and check if any of them are failing or not working properly.
7. Try Disabling Sound Effects/Enhancements
Irrespective of the Windows version that you are using, it will have a large number of sound effects in it. These sound effects are played according to the actions you are performing and the issues your computer is facing.
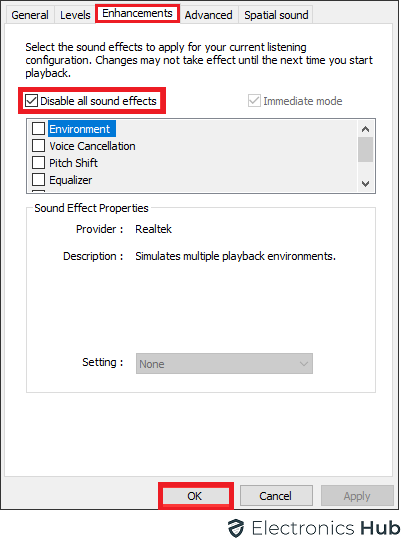
While these sound effects are highly important for a complete and immersive computing experience, they can also cause issues related to your CPU in some cases. Thus, try disabling all sound effects on your PC as shown here if you are facing the system interrupts 100% CPU usage issue:
- You have to first right-click on the speaker icon in the bottom right corner of your screen and open the Sounds/Playback Devices menu.
- Now, right-click on the default speaker device of your computer and open its properties. Here, head over to the Enhancements tab and select the Disable all enhancements option which should fix high CPU usage caused due to system interrupts.
8. Update the BIOS to the Latest Version
Similar to Windows or any other program installed on your computer, the BIOS of your computer can also have different versions thanks to regular updates released by your computer manufacturer. Such BIOS updates are meant to fix any possible bugs or issues related to your PC including the system interrupts high CPU usage issue. Thus, you can go to the website of your computer manufacturer and look for any available BIOS updates under their Support or Downloads section. If there is any update available, download and install it as per the instructions given on the computer manufacturer’s website.
9. Update Device Driver
Corrupt of faulty drivers, though we don’t often encounter them, can cause unusually high CPU usage as they try to trigger interrupts frequently. So, the simple solution is to update the drivers. There are multiple ways to do this.
Latest version Windows can pull up-to date drivers directly from the manufacturer through Windows Update. So, you can make use of this feature to update important drivers.

If you have a Windows Laptop, then the laptop manufacturer lists out all the drivers for your laptop (usually in the drivers and downloads section). They will even indicate the priority of the driver (such as optional, recommended, critical, etc.) so that you can first download the very-important ones first.
Alternatively, you can go to the website of hardware manufacturer directly (graphic card, network or Wi-Fi card, motherboard, etc.) and look for any driver updates. If there is a newer version of the driver than the one in your system, download the latest driver and install it.
A recent driver update could cause an issue that was previously non-existent. If the system allows, you can rollback to the previous driver and see if the System Interrupt 100% CPU usage issue has disappeared.

10. Disable USB Root Hub
The USB Root Hub is an important software component in a computer’s USB architecture. It acts as a pseudo device for the underlying USB Host Controller. Typically, the operating system recognizes the USB Root Hub as a primary interface. The USB Root Hub facilitates communication between peripherals, such as keyboards, mice, printers, and external drives and the computer’s motherboard.
Disabling the USB Root Hub can sometimes resolve USB-related issues. Users may encounter problems like unrecognized devices, slow data transfers, or malfunctioning peripherals. In many cases, these issues occur due to software conflicts or resource allocation problems. Disabling and then re-enabling the USB Root Hub can refresh the connections and potentially restore normal functionality.
Make sure to save any important work before proceeding, as disabling the hub may disconnect any attached USB devices.
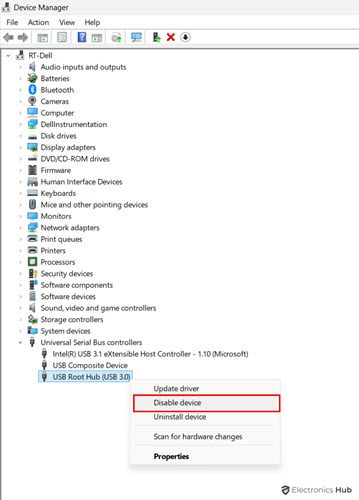
- First, open the Device Manager on your computer. To do this, you can right-click on the Start menu and select “Device Manager.”
- Next, you should locate the “Universal Serial Bus controllers” section. Expand this section to find a list of USB Root Hubs and devices.
- Once you identified the USB Root Hub you wish to disable, right-click on it and select “Disable device.”
- After disabling the USB Root Hub, you can re-enable it to restore functionality. To do this, simply return to the Device Manager, right-click on the disabled hub, and select “Enable device.”
11. End the Process Causing High CPU Usage
If a particular process or program is hogging up the CPU time, then you can end that particular task. To end a process in Windows, you can make use of the good old Task Manager.
- First, open the Task Manager. Press Ctrl + Shift + Esc on your keyboard, or right-click on the taskbar and select Task Manager.
- In the Task Manager, you’ll see a list of running applications under the Processes tab (you might need to click on “More details” if it’s in compact view).
- Find the task or application that is causing high CPU usage. You can scroll through the list, use the search box at the top, or sort the list by CPU Usage.
- Click on the task to highlight it, then click the End Task button at the top of the window. Alternatively, you can right-click on the task and select End task.

12. End Unnecessary Background Processes
While we are in the Task Manager, we can kill some background apps or processes. Windows Operating System has a lot going on in the background than what you see on the Desktop. There are a ton of services and processes that silently work in the background and may never require your attention. But if you are facing high CPU usage due to some background process that are affecting the System Interrupts, then you can end them from the Task Manager.
The process is once again simple. Open Task Manager, look for unnecessary background tasks in the Processes tab, and end those tasks.

13. Manage Startup Programs
Startup programs are applications that automatically launch when Windows starts. These programs can include software necessary for system functionality, such as antivirus tools, device drivers, and system utilities, as well as third-party applications like chat programs, cloud storage services, or game launchers.
These programs can contribute to high system interrupts, especially if they initiate processes that require significant resources or interact with hardware frequently. For example, applications that manage network connections, peripherals, or system resources can generate interrupts as they communicate with the hardware. Here’s how to manage and disable startup programs on Windows.
- Open the Task Manager. Right-click on the Taskbar and select Task Manager. Alternatively, you can press Ctrl + Shift + Esc.
- If Task Manager opens in a compact view, click on More details at the bottom. Then, click on the ‘Startup apps’ tab.
- You’ll see a list of programs that are set to run at startup, along with their status (Enabled/Disabled) and impact on startup performance.
- Right-click on any program you want to disable and select Disable. This prevents the program from starting automatically the next time you boot up your computer.

14. Disable Windows Fast Startup
Fast Startup is a feature in Windows designed to reduce boot time by preloading some system information before your PC shuts down. It combines elements of a cold shutdown and hibernation.
While Fast Startup significantly decreases the time it takes to boot your computer, some hardware components and drivers may not function properly with Fast Startup enabled, leading to performance issues.
If you decide that Fast Startup is causing issues or you simply want to disable it, follow these steps:
- First, open Control Panel. Right-click on the Start button and select Run, then type control and press Enter. Alternatively, press start and search for ‘Control Panel’.
- In the Control Panel, click on Hardware and Sound (assuming the view by option is Category). Then click on Power Options. In the left sidebar, click on Choose what the power buttons do.
- Click on the link that says “Change settings that are currently unavailable” at the top of the page.
- Scroll down to the section labeled Shutdown settings. Uncheck the box next to “Turn on fast startup (recommended).”
- Click on the Save changes button at the bottom of the page. Restart your PC for the changes to take effect.

15. Adjust Power Options
Balanced or Power-Saving power plans will significantly reduce the CPU performance, especially in a mobile device. If you have a laptop with Windows 11 on it, then open Settings by using Windows + I keyboard shortcut. Select the ‘System’ option from the left-hand menu.
Then select ‘Power & battery’ option from the right. Now in the Power mode, select ‘Best performance’ option.

Irrespective of desktops or laptops, there are some more power-related settings that you can perform.
- Press Windows + R to open the Run dialog, type control and press Enter to open the Control Panel.
- In the Control Panel with category view, click on “Hardware and Sound.” Then click on “Power Options.”
- In the Power Options window, you will see your current power plan.
- Click on “Change plan settings” next to the selected plan. In the next window, click on “Change advanced power settings.”
- A new window titled “Power Options” will appear. Here, you can expand the various categories (e.g., Sleep, USB settings, etc.) to modify advanced power settings according to your preferences.

16. Repair Corrupted System Files
Corrupted system files can lead to malfunctioning device drivers, which may not handle hardware interrupts properly. This can increase CPU usage as the system struggles to process interrupts.
System File Checker (SFC) is a built-in Windows utility designed to scan and repair corrupted or missing system files. Open Command Prompt as an administrator and run: sfc /scannow

17. Disable High Precision Event Timer
The High Precision Event Timer (HPET) is a hardware timer designed to provide more accurate timing and scheduling of events in computer systems. While HPET is designed to improve precision, its use can lead to an increase in the number of interrupts generated, particularly in systems that require frequent updates or precise timing for various tasks.
- Right-click on the Start menu and select Device Manager.
- In Device Manager, expand the System devices section.
- Look for High Precision Event Timer in the list of system devices.
- Right-click on High Precision Event Timer and select Disable device. Confirm any prompts.
- Restart your computer for the changes to take effect.

18. Reset Windows
If you tried all the above-mentioned methods but still are facing with high CPU usage due to System Interrupts, then you can reset the Windows as a last resort.
- Right-click on the Start button (or press Windows + I) and select Settings.
- In the Settings window, click on System from the sidebar.
- Scroll down and click on Recovery.
- Under Recovery options, find the Reset this PC section and click on the Reset PC button.
- You can choose to keep the files (removes apps and settings but retains personal files) or remove everything (deletes all personal files, apps, and settings).
- If you select Remove everything, you’ll be asked if you want to remove files and clean the drive or just remove files.
- Confirm your choices and click on Reset. Your PC will restart, and the reset process will commence.

19. Reinstall Windows
Instead of resetting the PC, you can go with a fresh and clean reinstall of Windows. Before proceeding, you have to back up your data using external hard drives, cloud storage, or USB drives.
After reinstalling, make sure to install the necessary drivers for your hardware. You can find them on the manufacturer’s website or use Windows Update.
Frequently Asked Questions
Can antivirus software cause high system interrupts?
Answer: Yes, antivirus software can cause high system interrupts by constantly scanning files, monitoring real-time network activity, and checking for threats. These actions require significant CPU resources and can lead to an increased number of interrupts.
How can I monitor system interrupts in real-time?
Answer: You can monitor system interrupts in real-time using tools like Task Manager or Resource Monitor on Windows. Open Task Manager by pressing Ctrl + Shift + Esc, then navigate to the “Performance” tab and select “Open Resource Monitor.” Here, you can see detailed information about CPU usage, including system interrupts.
Can a damaged USB device cause high system interrupts?
Answer: A damaged USB device can cause high system interrupts because the operating system repeatedly attempts to communicate with the faulty device. When the system detects errors or failures in the USB connection, it generates interrupts to manage the situation. This constant polling for device status can consume CPU resources and slow down the overall system performance
How does resetting network settings help with system interrupts?
Answer: Resetting network settings can clear any misconfigurations or conflicts in network protocols, drivers, or settings. These conflicts may lead to excessive network traffic or errors, causing the system to generate more interrupts as it tries to handle these issues.
Can overclocking cause high system interrupts?
Answer: Overclocking can cause hardware instability, which can lead to increased system interrupts. Overclocking pushes hardware components beyond their standard operating limits, potentially causing them to malfunction or become unstable. This instability can result in frequent interrupt requests as the system tries to manage errors and maintain operation.
Conclusion
Whether you have a highly powerful CPU or an entry-level one, making sure that it does not have high CPU usage in the background is highly important. This way you can get the most out of the processor and not face any lag issues due to high CPU usage.
Since high CPU usage is mostly caused due to background Windows services like system interrupts, we have given a complete guide on how to fix the system interrupts causing high CPU usage issue up above. If you have gone through all the information regarding the system interrupts 100% CPU usage issue, make sure to share your thoughts in the comments section. You can also post any questions down there if you have any!

