LED strip lights are right now one of the most popular and alluring parts of decorations for most occasions. As LED strips are available in different sizes, colors, and lengths, it is easy to get your hands on the perfect types of the LED strips for your requirement. Also, LED strip lights to create a great lighting and illumination effect if the light is reflected from a flat surface which makes it a perfect choice for decorative application.
Handling LED strip lights are very easy and it can be performed without needing any professional help. Today, we will be going through the complete procedure of installing new LED strip light. We will also include some additional information like splitting a single LED strip, Merging multiple LED strips, and using an RGB controller for the LED lights to make it a helpful guide for everyone.
Outline
TogglePowering The LED Strip Lights
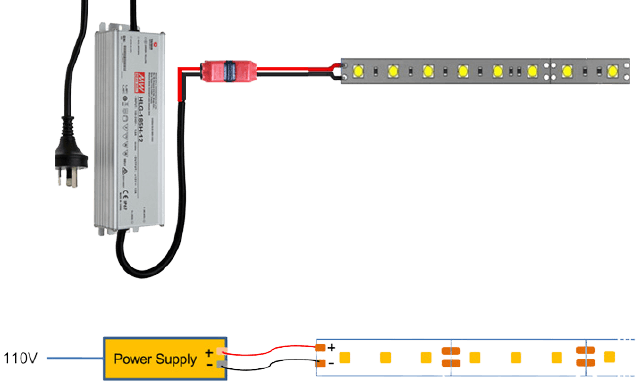
If you purchased only an LED strip reel, some changes have not arrived with proper wiring in the box and you have to do it yourself. With some basic wiring and a compatible driver, you can get this done with ease. Follow the steps provided below to power your LED strip lights.
- First of all, carefully unpack all of the components present in the package including the LED strip light reel.
- Then, you will have to connect the LED strip to the connector. Here, you will find a red and a black cable inside the connector.
- Connect the red cable with the “+” terminal of the LED strip and black wire to the “-” terminal.
- Once the wires are properly connected, simply push the rear side of the connector inwards to secure the connection.
- The other side of the connector needs to be connected to a suitable driver to power the LED strip light.
Connecting Multiple LED Strip Lights To
Single Power Source
In most cases, you will need a long strip of LED lights to cover a larger area. If you want to cover the periphery of a wall or a large desk, you might not find a single strip of LED that is long enough to cover it properly. In such situations, you will have to connect multiple LED strips. If you wish to connect them to a single power source, here’s how to do it.
- A single power adaptor is capable of powering two or more LED light strips simultaneously. But to be able to connect multiple LED strip lights to a single adapter, you will need a two-way power splitter first.
- Once you get your hands on a decent power splitter, make sure that the light strip wattage does not exceed the total output capacity of the adapter itself.
- Once you have confirmed the compatibility of the adapter and splitter, simply connect the LED strips to the splitter.
- Connect the single end of the splitter to the power adaptor directly that can be plugged into the AC wall socket.
Click Here To Know Battery-Powered LED Strip Lights
How To Install LED Strip Lights?
LED strip lights are very compact and linear in design as compared to other lighting equipment. This makes LED strip lights the most versatile option when it comes to installation. You can easily install an LED strip light over any flat surface and without any directional constraints.
The LED strip lights are also lightweight. This allows you to stick the LED light strip to any surface without worrying about it falling off eventually. You can install LED light strips behind a TV, under the cavity of drop-down ceilings, or below the furniture placed over the kitchen table in your kitchen.
Most LED strip lights come with pre-applied adhesive on the back which is covered by a protective film. Simply pull the top film away from the strip and you will be able to stick the LED strip lights directly. Alternatively, you can use 3M double-sided tape to ensure a firm grip on the rear side of the LED light strip. However, you should not cover the front portion of the LED strip light with tape as it can ruin the lighting effect by covering several LED lights present on the strip.
Is It Possible To Break LED Strip Lights?
If you have purchased a significantly longer LED light strip compared to your requirement and could not manage to fit the whole strip, you will have to cut it to a certain length. Cutting an LED strip light is very easy. Hence, it must be done carefully so that you don’t accidentally damage the LEDs on the strip.
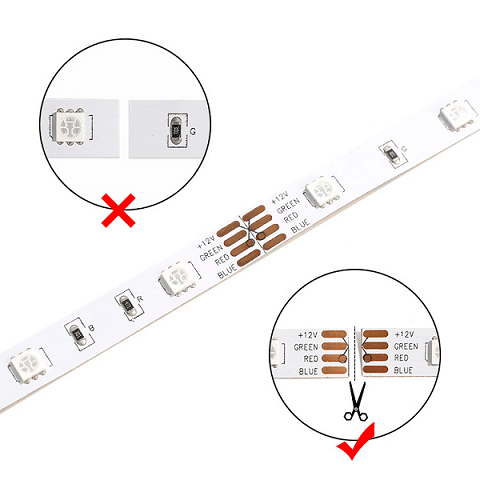
If you observe the LED strip lights carefully, you will find dedicated cutting markers on the strip. Generally, you will find these markings after every 3 or 6 LED lights on a strip. Once you cut the LED strip, you will find exposed copper pads on both ends of the section that will allow you to reconnect the strip to the same or different power source. Breaking the LED light strip in pieces will also allow you to install the lights at an angle or allow sharp turns on the walls or ceiling.
Coupling LED Light Strips Together
Connecting different LED strips help you to install the LED lights in difficult angles and corners. The best advantage of connecting different LED strips is the 90 degree turns which is most commonly needed when installing LED light strips on walls or ceilings. If you wish to couple multiple LED light strips together, here’s how to do it:
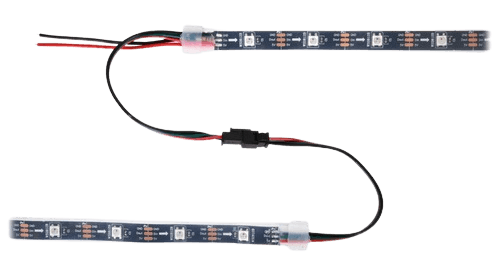
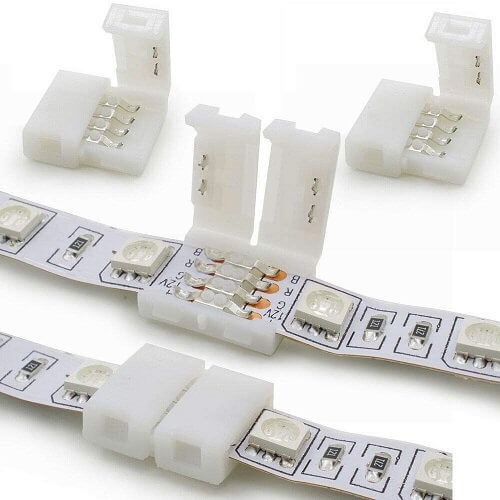
- If you wish to connect LED light strips easily, you need to get the fast solderless connectors available in the market. These connectors will allow you to connect LED light strips without much effort.
- If you have a fast solderless LED connector, simply remove the lock pad present on the connector.
- Then, peel a little bit of the covered section on the LED strip to reveal the adhesive side of the strip.
- After that, you can directly insert the light strip into the fast connector. While doing so, make sure that the copper pads on the strip align with the conductor pins of the connector.
- Once it is perfectly aligned and connected, close the lock pad of the connector.
If you do not wish to get a solderless connector, you will need to manually solder the connections between the LED strips. This process must be performed with extreme care and precision as wrong soldering can damage the LED strip.
RGB Connection & RGB Control For LED Strip Lights
One of the most used LED light strips is RGB that allows many different color options for the light output. Along with different colors, RGB LED light strips also come with a dedicated RGB controller that has predefined modes for the lighting effect. These modes are suitable for special occasions where you want to introduce additional effects in the lighting area.
The RGB connectors are included along with the RGB LED light strips. Here’s how you can connect the controller with the LED light strip:
- RGB LED strips have a higher number of terminals as compared to regular strips and they are indicated by the symbols “+”, “G”, “R”, and “B”.
- You will find similar terminals on the RGB controller included with the RGB LED light strip.
- To connect the controller with the strip, you need to simply connect the identical terminals of the RGB connector and LED strip.
- Then, we need to connect the RGB connector directly with the power supply with the help of power cables or a DC connector.
- If your RGB controller has a 4 pin connector pre-installed on the device, you need to simply insert the connector in the strip, and you are done.
Connecting LED Strip Lights In Series
LED light strips are designed in such a way that you can connect them together to create a singular lighting strip according to your requirements. But, if you wish to connect multiple LED light strips together, you must connect them in series. This way, You can make sure that the LED light strips are protected from sudden voltage surges as well as voltage drop.
- To connect multiple LED strip lights in series, you will have to introduce an extra component in the circuit which is an LED amplifier.
- Let us consider multiple RGB LED strips need to be connected in series to a single source and controlled by a single RGB controller. Here, you will require an LED amplifier for each strip of LED except the first one.
- First of all, connect the RGB controller with the first strip and power supply by following the steps provided in the previous section.
- After that, you will have to connect an LED amplifier to every individual LED strip. The LED amplifiers for RGB LED strips also have identical terminals as available on the strips.
- Once all LED amplifiers are connected with the strips, you will have to connect the amplifier terminals with the identical terminals present on the RGB controller. For that, you can route an additional wire from the connecting wire of the RGB controller and connect it to the designated port on the amplifier simultaneously.
- If you wish to power the LED strips with different power supplies, you will require additional power adaptors. In this configuration, you simply have to route the power cables coming from the LED amplifier to their designated power supply unit’s ports instead of connecting them with the same cables present on the first power supply. Make sure you carefully connect the positive terminal with the red cable and the negative terminal with the black cable.
Conclusion
LED strip lights surely look very attractive and alluring once it is properly installed. But, you have to follow a somewhat tedious procedure to install the LED light strips correctly. The process is a bit more complicated if you have opted for RGB LED strips instead of a single color option. Fortunately, there are many additional components available that will save you the trouble of manual work while installing these LED lights.
Today, we have looked at all of the necessary steps that need to be taken while installing LED strip lights. If you follow our guide carefully, we can assure you that you can install these lights easily without needing any additional help. Also, you can reach us via the comment section if you have trouble regarding the installation of LED strip lights.


One Response
You too really guys 💪