Formatting your SSD might sound like a daunting task, but mastering this process is crucial in ensuring your drive’s optimal performance and longevity. In this comprehensive guide on ‘How to Format SSD,’ we unravel the steps, precautions, and insider tips to make this seemingly complex procedure a breeze. Whether you’re preparing for a fresh OS install, troubleshooting disk issues, or safeguarding sensitive data, understanding the ins and outs of SSD formatting is essential. Join us on this journey to demystify the process and empower yourself with the knowledge to confidently manage your SSD’s health and functionality.
Outline
ToggleWhen should I format my SSD?
Formatting your SSD becomes necessary under specific circumstances:
New SSD Installation: If you’ve recently acquired a new SSD, formatting is a crucial step to integrate it with your operating system. During the OS installation process, you’ll encounter an option to select the new SSD and initiate the formatting procedure. This ensures the SSD is ready for use and optimized for performance.
Reusing an Existing SSD: When repurposing an existing SSD, it’s imperative to format the drive before reinstalling the operating system. Keep in mind that formatting involves clearing drive partitions, resulting in the deletion of all data. To prevent data loss, always back up your drive contents before proceeding with the formatting process.
Preparing for Resale or Donation: If you intend to sell or give away your SSD, consider securely erasing the drive using tools or third-party utilities that support secure erase or NVMe format. This step is crucial as it permanently deletes all data on the drive, ensuring your sensitive information remains confidential.
Understanding when to format ensures the longevity and optimal performance of your solid-state drive.
Safety Considerations Before Formatting an SSD
Before embarking on the formatting journey for your SSD, several critical safety considerations warrant attention to safeguard your data and maintain the SSD’s performance:
- Backup important data first: Prior to initiating the formatting process, ensure a comprehensive backup of all crucial files stored on the drive earmarked for formatting. While reformatting erases data practically, sophisticated methods could potentially recover the information. A thorough backup is essential to prevent data loss.
- Select Quick Format: Distinguishing SSDs from traditional HDDs, the formatting process demands a specific approach. Opt for a Quick Format when formatting an SSD to streamline the process. Unchecked, a Full Format might trigger a complete read/write cycle, which can diminish the SSD’s lifespan. Quick Format tailored for SSDs ensures an efficient formatting without impacting longevity.
- Enable TRIM to maintain SSD performance: For systems supporting TRIM, activating this feature is pivotal to optimize SSD performance. Similar to defragmenting for HDDs, TRIM manages data on the SSD, eliminating unnecessary saved files. Though SSDs don’t require defragmentation, TRIM functions akin to this process, marking space as available by replacing original data with dummy data. This dummy data, while retained, is perceived by the SSD as available space, enhancing performance.
Prioritizing these safety measures before formatting an SSD ensures the integrity of your data and maximizes the SSD’s operational efficiency without compromising its lifespan.
How to Format an SSD?
Formatting an SSD involves specific methods tailored for its technology to ensure optimal performance and longevity. Let’s explore the step-by-step processes involved in formatting an SSD, considering different approaches for seamless execution.
Method – 1: By Using File Explorer
Formatting an SSD via File Explorer is a straightforward process within the Windows environment. Follow these steps meticulously to format your SSD effectively using File Explorer:
- Access File Explorer: Open File Explorer by either clicking on the folder icon in the taskbar or pressing the Windows key + E.
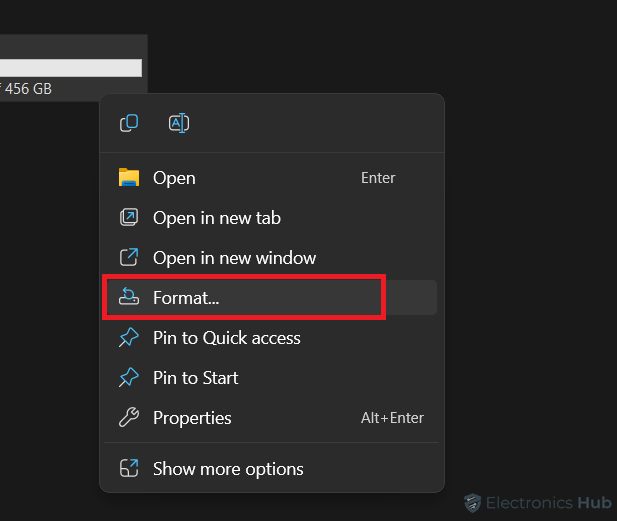
- Locate the SSD: Identify and right-click on the SSD drive you intend to format. Ensure you select the correct drive to avoid accidental formatting of other drives.
- Choose Format Option: From the context menu, select the “Format” option. This action opens a new window where you can configure the formatting settings.
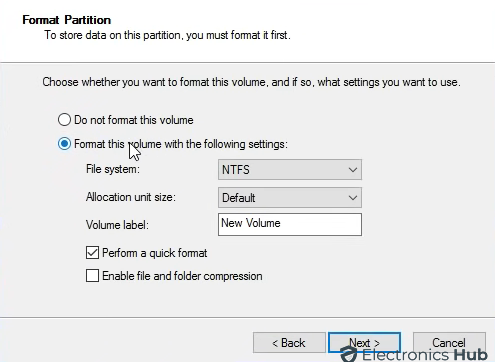
- Configure Format Settings: Within the formatting window, choose the desired file system (such as NTFS or exFAT) and allocation unit size. You might also have the option to perform a quick or full format.
- Opt for Quick Format: Ensure to check the “Perform a quick format” box for a swift formatting process.
- Confirm and Initiate: Finally, click “Next” to confirm the settings and start formatting your SSD through File Explorer.
Method – 2: By Using Disk Management
Formatting your SSD through Disk Management is a precise process. Here’s a concise guide to achieve it:
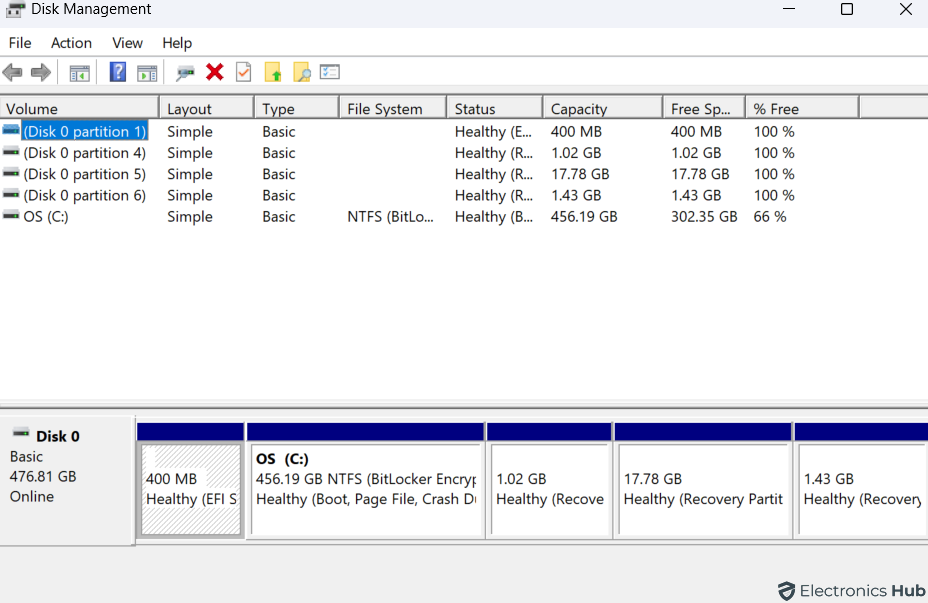
- Access Disk Management: Right-click on the Windows Start button and select “Disk Management” from the menu.
- Locate the SSD: Identify and choose the SSD you intend to format from the list displayed.
- Right-click and Format: Right-click on the selected SSD and choose the “Format” option.
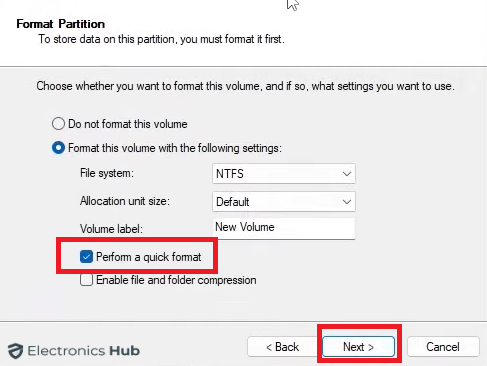
- Choose File System and Allocation Unit Size: In the dialog box that appears, select the desired File System (commonly NTFS), specify the Allocation Unit Size, and ensure to check the “Perform a quick format” option.
- Confirm Formatting: Click “Next” to confirm the selected settings and proceed with the formatting process using Disk Management.
How to Format an SSD on Mac?
Formatting an SSD on a Mac involves a straightforward process. Follow these steps to ensure a seamless formatting experience:
- Connect the SSD to your Mac: Use a compatible cable to connect the SSD to your Mac.
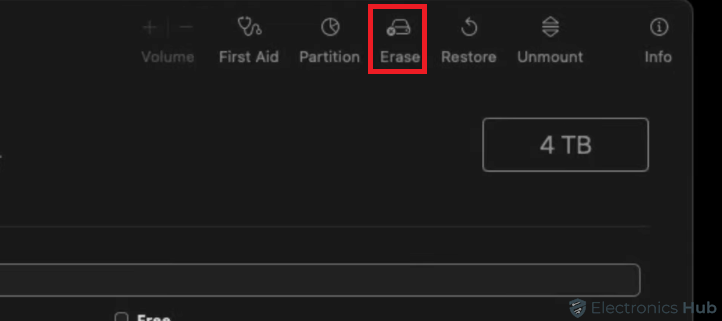
- Open Disk Utility: Launch “Disk Utility” from the Applications > Utilities folder.
- Select the SSD: From the left sidebar, choose the SSD you intend to format.
- Erase the SSD: Click on the “Erase” tab at the top of the Disk Utility window.
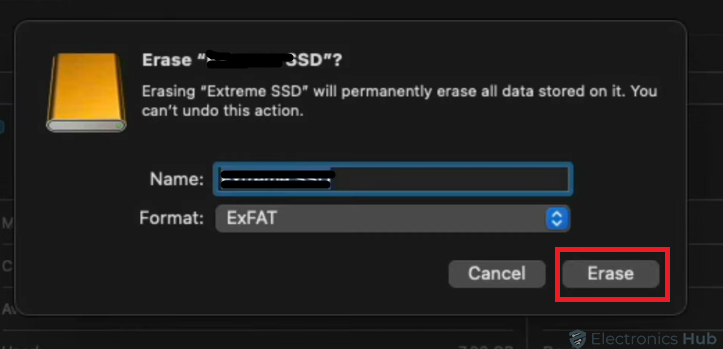
- Configure Format and Scheme: Choose the desired format (like APFS or Mac OS Extended) and partition scheme.
- Enter Name and Confirm: Provide a name for the SSD and click on the “Erase” button to initiate the formatting process.
Format an SSD – FAQs
Ans: Formatting refers to the process of preparing a storage device (such as an SSD) for initial use or clearing all existing data. It involves setting up a file system that the operating system can understand and use for storing and retrieving data.
Ans:
* Initial Setup: When setting up a new SSD for the first time.
* Removing Data: To erase all data on the SSD securely.
* Operating System Reinstallation: Before installing a new operating system.
* Performance Optimization: Sometimes, a clean format can improve SSD performance.
Ans: Quick Format: Only erases the file system without checking for bad sectors. Faster but less thorough.
Full Format: Checks for bad sectors and erases all data. Takes longer but is more comprehensive.
Ans: Yes, formatting erases all data, including the operating system. If you want to keep the OS, you’ll need to reinstall it after formatting.
Ans: Once you’ve formatted an SSD and overwritten the data, it’s generally not possible to undo the format and recover the data unless you’ve previously backed it up.
Conclusion
In conclusion, formatting your SSD is a crucial step for optimal performance and data security. Remember to back up your data before diving in, choose a “Quick Format” for efficiency, and enable TRIM for long-lasting performance. With the methods outlined for Windows and Mac, you can confidently format your SSD and enjoy its full potential. Now go forth and conquer the digital world with your freshly formatted SSD!

