Does your Gmail sometimes send important emails to the spam folder? Then, how to fix it? Luckily, there’s a way: Whitelisting. Whitelisting is like creating a VIP list for your inbox. You tell Gmail which senders you trust, so their emails always go straight to your inbox, not the spam folder.
But how can you add certain senders to Gmail’s whitelist, no matter whether you’re using the desktop version or the mobile apps for Android or iOS? Continue reading to learn more about whitelisting and its configuration step by step.
Outline
ToggleWhy Should I Whitelist Emails In Gmail?
Gmail has robust spam filters that work tirelessly to keep unwanted emails out of your inbox. Though these filters are effective, they do occasionally mark legitimate emails as spam. This might lead to lost opportunities, delayed reactions, or even the loss of important information.
- Whitelisting credible senders allows you to avoid the spam filter and ensure that their emails always reach your inbox.
- You can never miss newsletters, organization updates, and emails from colleagues and clients.
- Gives you more control over your inbox.
- Streamlines the email management process.
- Saves you the hassle of searching for legitimate messages.
- Improved communication.
How To Whitelist An Email In Gmail Via desktop?
Follow these steps to whitelist an email in Gmail on your desktop:
- Log into Gmail and sign in to your account.
- Click on the gear icon located in the top-right corner of the screen to access the “Settings” menu.
- From the dropdown menu, select “See all settings.“
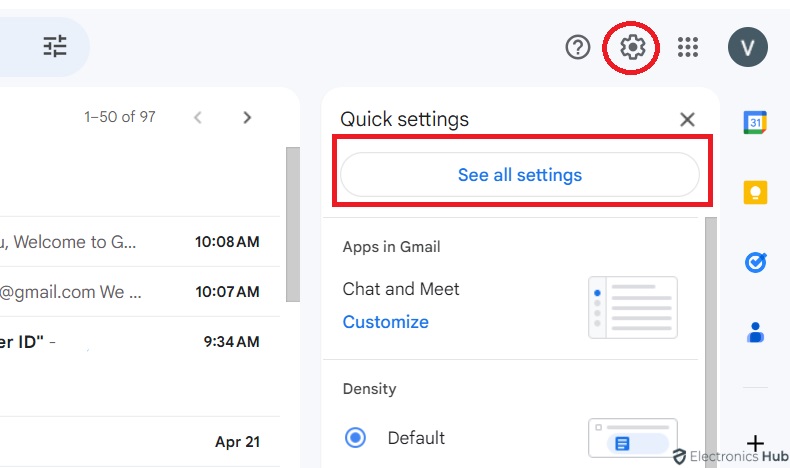
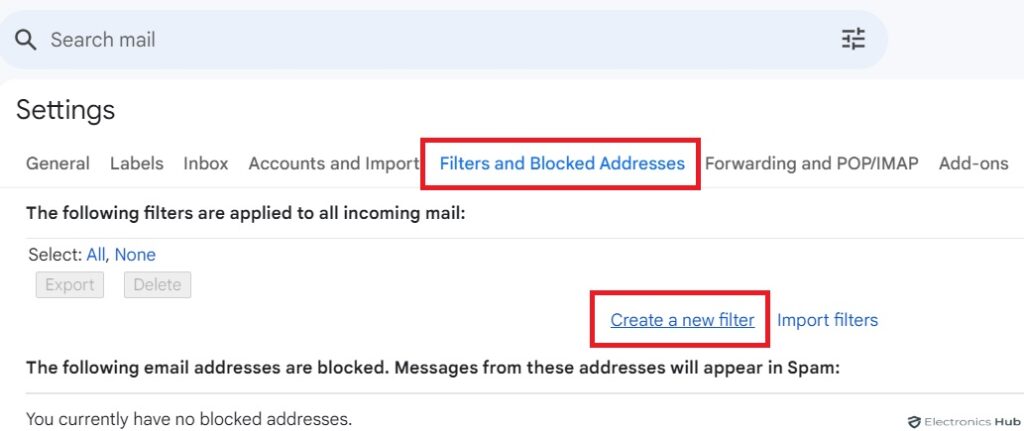
- Navigate to the “Filters and Blocked Addresses” tab.
- Scroll down and click on the “Create a new filter” link.
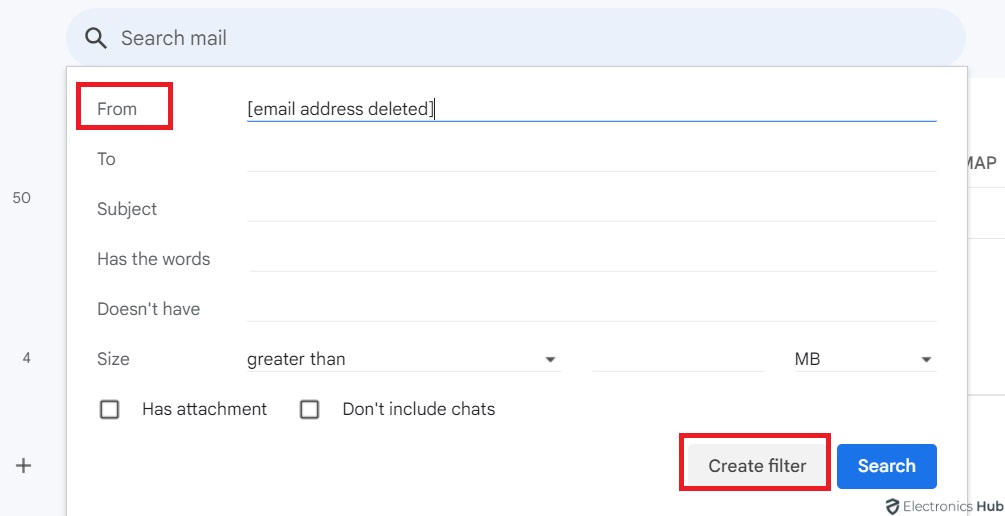
- In the “From” field, enter the email address you want to whitelist (for example, [email address deleted]).
- Click on the “Create filter” button.
- Check the box next to “Never send it to Spam.”
- Tap the “Create filter” button to save your changes.
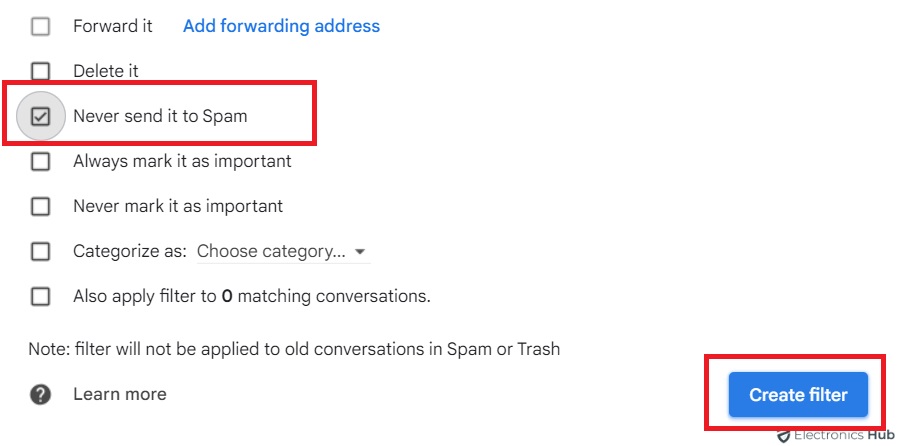
Now, emails from that sender will bypass the spam filter and land directly in your inbox.
How to whitelist an email in Gmail via an Android phone?
Gmail app on Android doesn’t offer direct access to filter settings. But still, you can whitelist emails. Here’s how:
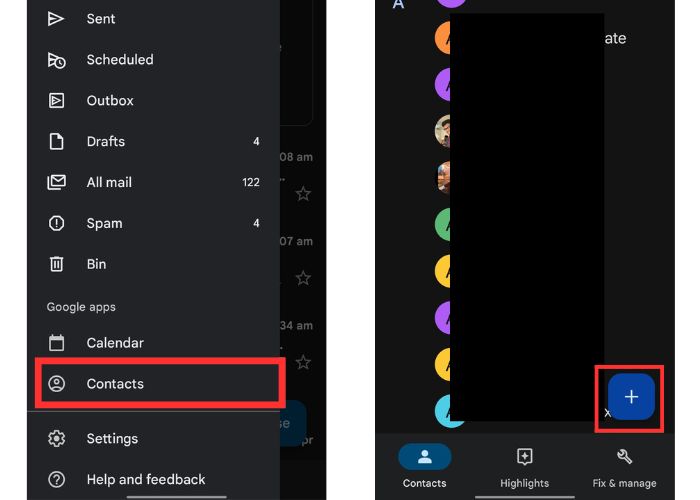
- Launch the Gmail app and navigate to “Contacts” (or) Open the Contacts app on your Android phone.
- Tap the “Add” button at the bottom right corner.
- Enter the contact’s name and email address you want to whitelist.
- Make sure to save the contact to the correct Gmail account where you receive their emails.
- Tap the down arrow next to “Account” and select the appropriate Gmail account.
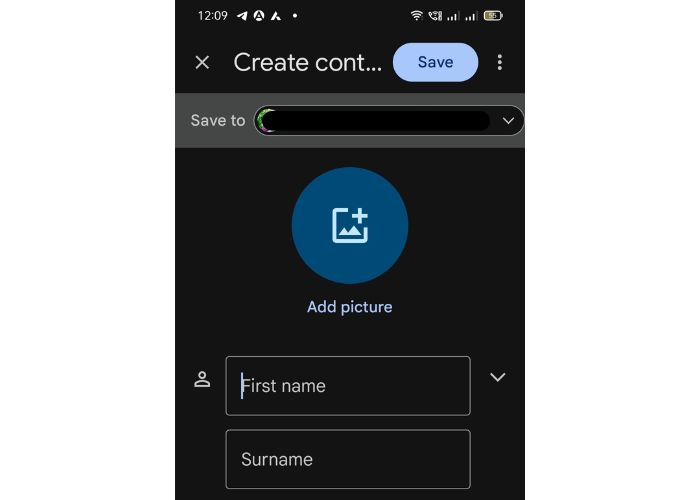
- Once you’ve filled in the information, tap “Save“.
By adding the sender’s information to your contacts, Gmail recognizes them as a trusted source. And delivers their emails to your inbox instead of the spam folder.
How to whitelist an email in Gmail via iPhone?
- Open the Gmail app on your iPhone.
- Find the email you want to whitelist in your spam folder.
- Tap on the email to open it.
- Look for a small gray box at the top of the email. This box might contain the sender’s name and email address.
- Within the gray box, you should see an option that reads “Report not spam” or it might have three dots with “Report not spam” as one of the options.
- Tap on “Report not spam“.
This action notifies Gmail that you trust this sender and want their emails to be routed to your inbox instead of the spam folder.
While this method doesn’t technically create a whitelist, it trains Gmail’s spam filter to recognize the sender as legitimate.
How To Whitelist A Domain In Gmail?
Whitelisting a domain is quite similar to whitelisting an individual email address in Gmail. Here’s how to do it:
- Log in to Gmail and make sure you’re on the desktop version.
- Click the “Settings” icon (gear icon) in the top right corner.
- Select “See all settings” from the drop-down menu.
- Click on the “Filters and blocked addresses” tab at the top.
- Click on “Create a new filter.”
- In the “From” field, enter the domain name after the “@” symbol. For example,”@mycompany.com“.
- Scroll down and tap on “Never send it to Spam.”
- Click “Create filter” to save your changes.
- Now emails from any address ending in “@mycompany.com” will skip the spam filter and go straight to your inbox.
Troubleshooting Issues When Whitelisting Emails In Gmail
Here are a few troubleshooting tips to help you overcome common challenges:
1) Make sure that the email address you entered when whitelisting is valid. Even a minor typo can prevent the desired sender from being whitelisted.
2) If you have previously marked emails from the sender as spam, they may still end up in your spam folder even after whitelisting. So, make sure to check your spam folder regularly and move any false positives to the inbox.
3) Your custom filters might be overriding your whitelisting settings. So, if you’re wondering why your emails aren’t getting through, try clearing those filters. Review your filters to make sure they don’t clash with the whitelisted sender.
4) If you still experience issues with whitelisting, it is advisable to reach out to Gmail support for further assistance. They can help troubleshoot the problem and provide personalized solutions.
FAQs:
Whitelisting creates a permanent rule for future emails. Marking “not spam” trains Gmail for that specific email but isn’t a guaranteed whitelist solution.
No, whitelisting only allows emails from specific senders or domains to bypass the spam filter. Gmail’s spam filters are still working and will catch most unwanted emails.
Don’t worry! You can easily remove an email address or domain from your whitelist. Follow the same steps for creating a filter, but instead of “Never send it to spam,” select “Mark it as spam” this time.
Conclusion
Now that you’ve learned how to whitelist emails in Gmail, it’s time to take control. Add your important senders to the whitelist and experience a clutter-free inbox where every message is important. Remember, whitelisting is only for trusted sources, so keep your spam filter in good working order. Open your Gmail and put these whitelisting tips into action today!

