Dealing with a messy inbox can really eat up your time and stress you out. But what if you could automate it so you can focus on the things that truly matter?
In this guide, we’ll show you how to use Gmail’s filters to automatically sort your emails into specific folders. With filters, you can significantly reduce the time spent sorting emails and ensure important messages are easily accessible. Come along as we explore the world of Gmail filters and learn how to turn your disorganized inbox into a well-run system.
Outline
ToggleAll About Gmail’s Folder System
Actually, Gmail doesn’t use a traditional folder system like other email providers. Instead, it relies on a system called “labels.” Labels work like folders, but they have some key advantages.
Unlike folders, where an email can only be found in one place, Gmail’s labels allow you to give several labels to the same email. You can categorize emails based on different aspects, making organization more flexible. And if you want to take your search to the next level, you can also use the search bar to narrow down your results even further.
Here’s a breakdown of key points about Gmail’s label system:
- Pre-Existing Labels: When you open your Gmail account, you’ll find some pre-made labels on the left-hand sidebar. These include Inbox, Starred, Sent, Drafts, and Trash. These serve as basic starting points for organization.
- Customizable Labels: The beauty of labels lies in creating new ones to fit your specific needs. You can create labels to categorize emails by project, client, type of email (e.g., newsletters, receipts), or any other criteria that help you stay organized.
Why To Set Rules In Gmail?
Setting up rules in Gmail not only helps you automate your inbox organization but also streamlines your email workflow. Here’s how they can help:
- Keep your main inbox organized by sorting incoming emails based on your criteria.
- Focus on important emails from specific senders or with certain keywords in the subject line.
- Easily manage emails that you receive frequently, such as newsletters or social media notifications.
- You can save time and be more productive by automating repetitive tasks such as moving or deleting emails with rules.
- Your inbox is tailored to your work style and priorities.
- It’s super easy to find specific emails later.
- You won’t miss any important messages while going through your inbox.
How To Move Emails Automatically To A Folder In Gmail?
Now that you grasp the purpose of setting rules in Gmail, let’s look into the automation process. You can easily move your emails to a folder by setting up certain rules. There are two ways: you can either create a new rule right from scratch else create a rule based on a specific email.
Via Web Interface
Creating a Rule From Scratch:
1) Login to your Gmail account.
2) Click in the search bar at the top and then select “Show Search Options”.

3) Define your criteria for filtering emails. This could include who the email is from (From), who it’s sent to (To), keywords in the subject line (Subject), or even specific words in the body of the email (Has the words).
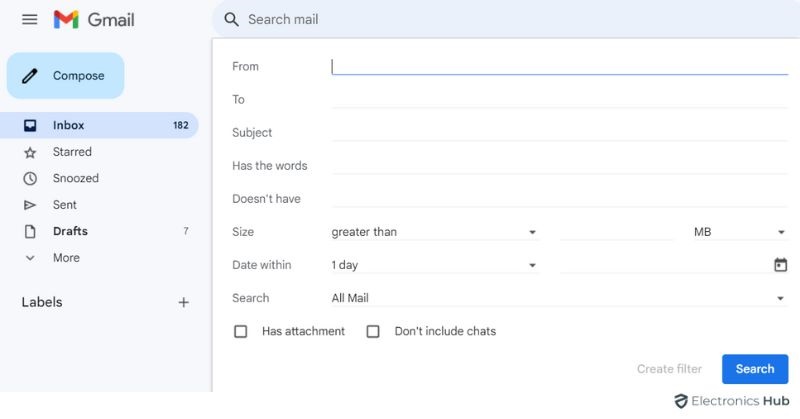
4) Once you’ve set your criteria, click “Create Filter” at the bottom of the search window.

5) Choose what you want the filter to do to emails that match your criteria. You can archive them, label them, mark them as important, or even delete them.
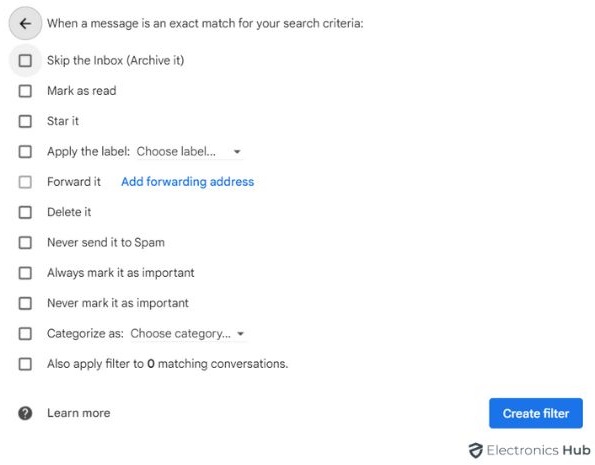
6) Hit “Create Filter” to activate the rule.

Creating a Rule Based on a Specific Email:
1) Open your Gmail and find the email you want to create a rule for.
2) Click the checkbox next to the email.
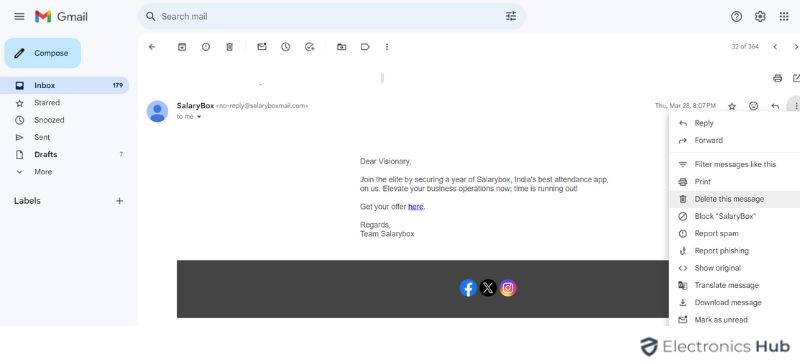
3) Click the three vertical dots (…) and select “Filter Messages Like These”.
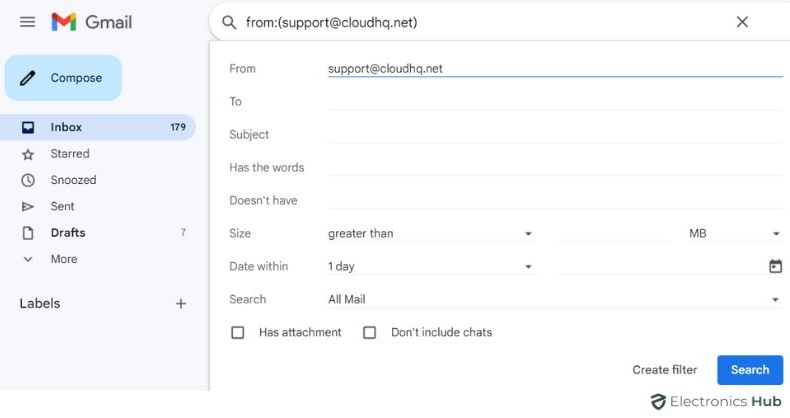
4) Gmail will automatically populate some of the criteria based on the selected email. You can edit this further or leave it as is.
5) Choose what action you want the filter to take for emails matching this criteria.
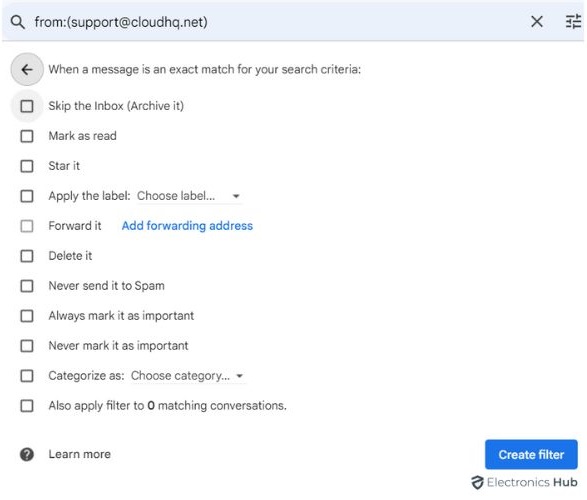
6) Click “Create Filter” to confirm.
Once after creating the rule, Gmail will automatically apply it to incoming emails that match the specified criteria. This can significantly streamline your email organization process and save you time and effort.
Via Gmail App
Unfortunately, the Gmail app for Android or iOS does not offer the option to create automatic filters or rules directly on the phone. You can only access this feature through the Gmail web interface. After setting up the rule on the web interface, it will automatically be applied to your Gmail account on all devices, including Android and iPhone. Your phone will automatically move any new emails that match the rule criteria to the designated folder.
Moreover, you can even opt for some third-party email management apps. They have features that are similar to the filters in Gmail. However, their functionalities and compatibility can vary. So, just be careful and check if they match your security preferences before using them.
Troubleshooting Common Issues While Setting Filters In Gmail
While Gmail’s filters and rules are powerful tools for email organization, they may occasionally encounter issues or not behave as expected. Let’s talk about a few common problems along with ways to fix them:
- Filter Not Working: Just make sure to review the criteria you’ve set for your rule to ensure it matches the emails you want to filter. Make sure there are no mistakes or rules that clash.
- Filter Applying to the Wrong Emails: Review your rules and their order of execution. Gmail applies filters in the order they appear, so if you have conflicting rules, the wrong filter may be applied. Adjust the order or edit the rules accordingly.
- Missing Emails: If you suspect that emails are not being filtered correctly, check your spam and trash folders to ensure they haven’t been accidentally filtered out.
- Inconsistent Behavior: If your rules are not consistently applying labels or moving emails, try disabling any browser extensions or add-ons that might be causing interference with Gmail’s functionality.
Tips For Effective Email Organization
Organizing your emails effectively goes beyond creating labels and rules. Here are some additional tips to help you master email organization in Gmail:
1) Develop a logical hierarchy for your folders and labels, making it easy to navigate and locate emails.
2) Use search filters to find specific emails based on criteria such as sender, subject, or date.
3) Regularly review and declutter your inbox by archiving or deleting emails that are no longer relevant or necessary.
4) If you receive emails from multiple accounts, consider setting up email forwarding to consolidate all your messages in one place.
5) Use keyboard shortcuts to navigate your inbox and perform actions more efficiently in Gmail.
6) As your email patterns change, review and update your rules to ensure they continue to meet your needs.
Frequently Asked Questions
If you want to move multiple emails in Gmail, select the emails you want to move. Then, click the “Move to” label option (usually a folder icon) and choose the destination label to bulk move them all at once.
You can access and manage all your filters in the Settings menu. Go to Settings > See all settings > Filters and Blocked Addresses. Here you can edit, delete, or disable filters as needed.
By default, filters only apply to future emails. If you want to apply a filter to existing emails matching the criteria, you can choose “Apply the filter to [number] matching conversations” during the filter creation process.
Conclusion
That’s all. We hope you find this blog helpful. Get started with implementing strategies and rules right now to experience the benefits of an organized inbox.

