Is your Google Sheet feeling overwhelming? With data scattered everywhere, it can be tough to find what you need. But don’t stress! Grouping rows and columns can transform your spreadsheet from chaos to clarity.
In this guide, we’ll show you exactly how to group information in Google Sheets. By the end, you’ll be able to organize your data, make it easier to read, and save time when working with your spreadsheets. Let’s find out!
Outline
ToggleBenefits Of Grouping In Google Sheets
Before proceeding with the process of grouping rows or columns in Google Sheets, let’s understand why you might want to do this. Grouping data offers several benefits, including:
- Easier Navigation: You can collapse or expand groups to quickly move through large datasets.
- Clearer Views: Grouping keeps your spreadsheet tidy, making it easier to focus on specific data sets.
- Faster Edits: When you group data, you can update entire sections at once without affecting others.
- Smoother Analysis: Analyzing data in groups helps identify trends and make comparisons swiftly.
- Structured Presentations: Groups help organize your data into clear, logical sequences for presentations.
How To Group Rows In Google Sheets?
Grouping rows in Google Sheets helps organize your data effectively. You can achieve this using two efficient methods: the right-click menu or keyboard shortcuts. Let’s explore both options in detail to streamline your data management process.
1. From Right Click Menu
Grouping rows in Google Sheets is simple using the right-click menu. This intuitive method lets you organize your data quickly. Here’s how:
- Open the Google Sheet where you want to group rows.
- Click on the row number on the left to select the rows you want to group.
- To select multiple rows, hold down the “Ctrl + Shift” keys (Windows) or “Cmd + Shift” keys (Mac) and click on the row numbers.
- Alternatively, click and hold the left mouse button, then drag over the adjacent row numbers you want to group.
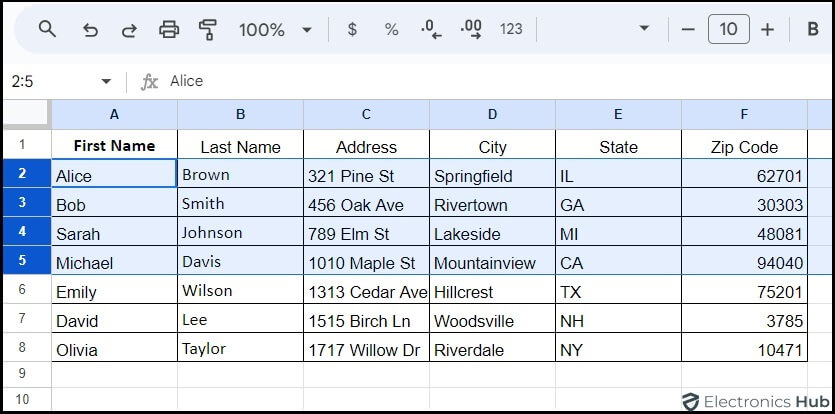
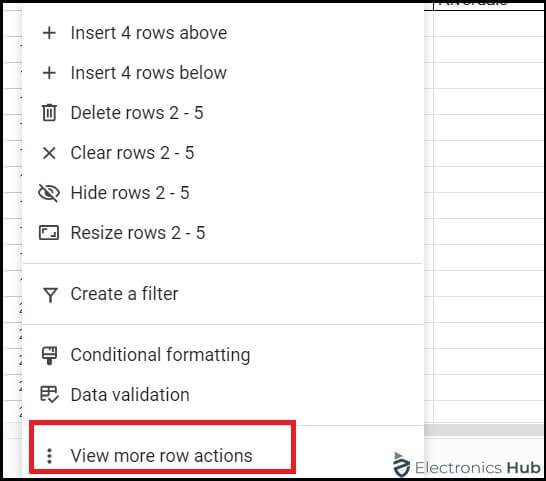
- Once the rows are selected, right-click on any of the selected row numbers.
- From the drop-down menu, click on “View More Row Actions.”
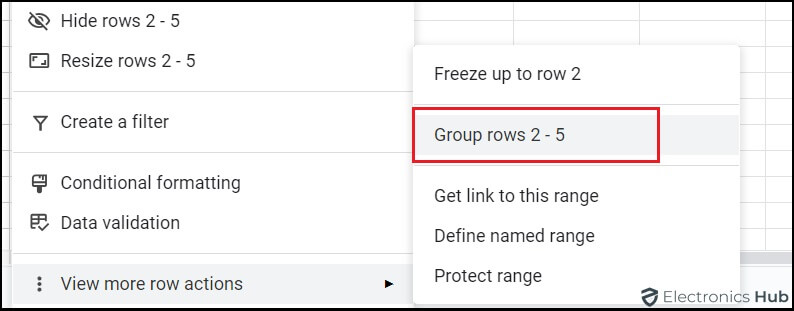
- In the second drop-down menu, select “Group rows.”
- The grouped rows will now display a minus (-) sign on the left side, indicating they are grouped.

2. Using Keyboard Shortcuts
In addition to the right-click menu, you can also group rows in Google Sheets using keyboard shortcuts. Here’s how:
- Select Rows: Highlight the rows you wish to group.
- Open Menu: Press Alt + Shift + Right Arrow on Windows or Option + Shift + Right Arrow on Mac.
- Group Rows: This shortcut will group the selected rows.
Once you’ve grouped the rows, you can also name the group for easier identification. Here’s how:
- Right-click on the grouped rows.
- Select “View more row actions” from the drop-down menu.
- Then, select “Define named range” from the subsequent menu.
- A dialog box will appear where you can enter a name for your grouped rows. Type your desired name and click “Done” to apply.
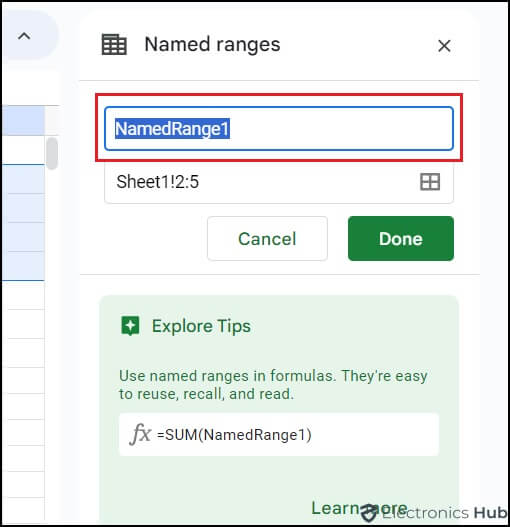
Naming your grouped rows can be particularly helpful when working with complex datasets, as it provides a clear label for the grouped section.
How To Group Columns In Google Sheets?
Grouping columns in Google Sheets follows a similar process to grouping rows, with just a slight adjustment. Instead of selecting rows, you’ll select columns to group together. Follow the below steps to learn how:
- Start by selecting the columns you want to group. Right-click on one of the selected columns, choose “View more column actions,” and then select “Group Columns.” The chosen columns will now be grouped together.
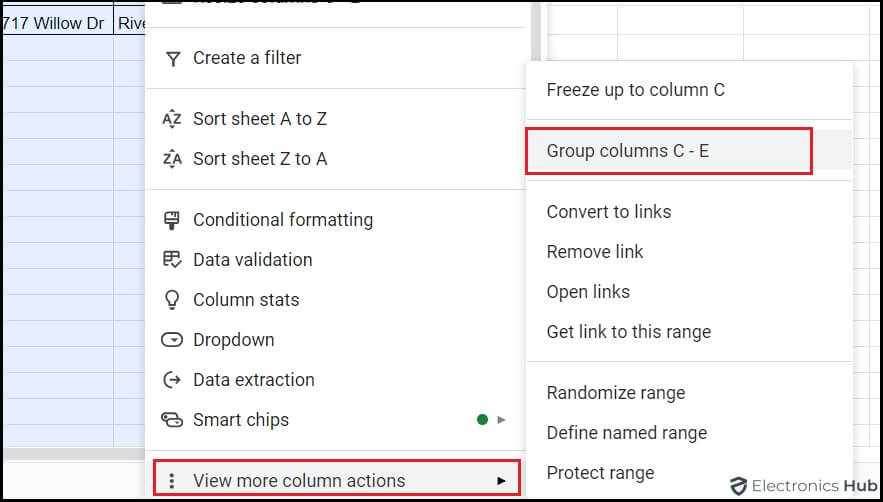
Keyboard Shortcuts:
- Windows: Press and hold Alt, Shift, and the right arrow key together.
- Mac: Press and hold Option, Shift, and the right arrow key together.
Note: To collapse or expand grouped rows or columns, click the minus sign (to collapse) or plus sign (to expand) located on the left side or top of the sheet.

How To Group Rows or Columns In Mobile?
Apart from using Google Sheets on Windows or Mac, you can also group rows or columns directly on your mobile device. Here’s how you can do it:
- Open your Google Sheet on the Google Sheets app on your mobile device.
- Tap the first row or column you want to group. This action will highlight it with two small dotted circles.
- Tap and drag one of the dotted circles to select additional rows or columns. Once you’ve selected the desired rows or columns, press and hold the selected area. Tap the three dots at the right end of the menu to open a new drop-down menu.
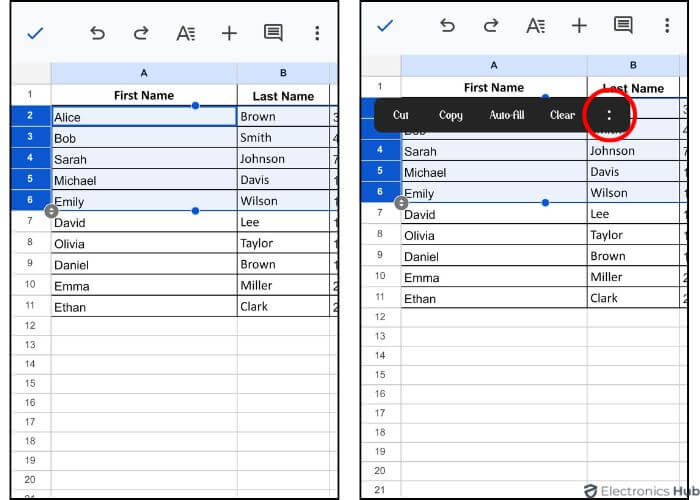
- In the drop-down menu, scroll down and tap on the “Group” option.
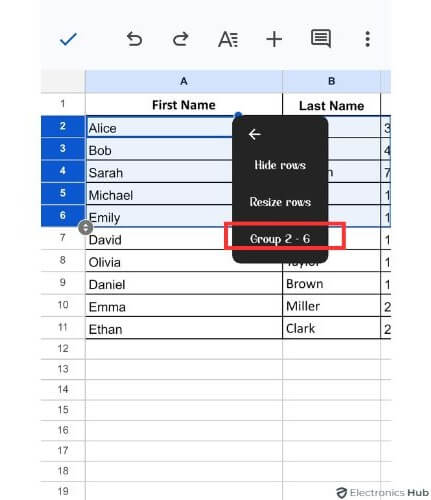
- The selected rows or columns will now be grouped together.
Similar to the desktop version, to collapse or expand the grouped rows or columns, simply tap on the minus sign (-).
How To Ungroup Rows Or Columns In Google Sheets?
After learning how to group rows and columns in Google Sheets, you might need to ungroup them at some point. Whether it was a mistake or the grouping is no longer needed, ungrouping is simple. Here’s how you can ungroup rows or columns in Google Sheets.
Ungrouping All Grouped Rows Or Columns
If you want to ungroup all the grouped rows or columns at once in Google Sheets, follow these steps:
- Right-click on the bar above the grouped columns or beside the grouped rows. Select “Remove group” from the drop-down menu to ungroup all the rows or columns.
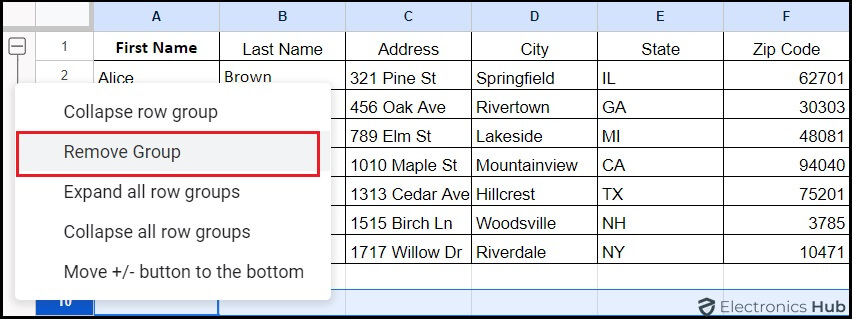
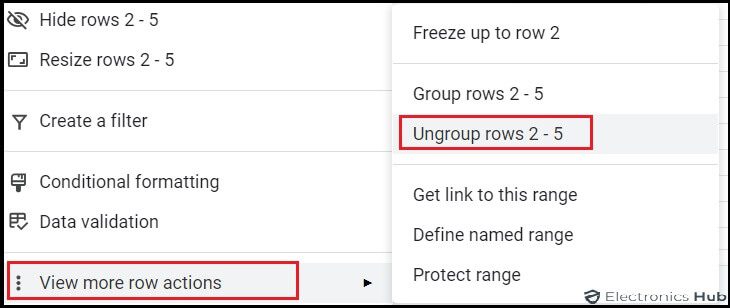
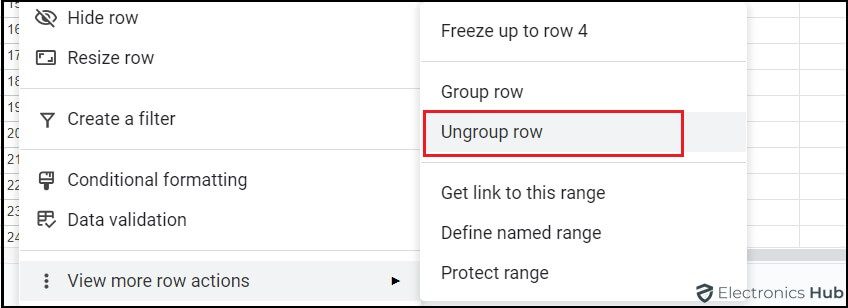
- Alternatively, Right-click on any grouped row or column. Select “View more row actions” or “View more column actions,” based on what you need to ungroup. Choose “Ungroup Rows” or “Ungroup Columns” from the drop-down menu.
Keyboard Shortcuts:
Choose the grouped rows or columns, then press:
- Windows: Shift + Alt + Left Arrow key.
- Mac: Option + Shift + Left Arrow key.
Ungrouping Selected Rows Or Columns
Sometimes, you might want to ungroup specific rows or columns from a grouped set in Google Sheets. Here’s how:
- Select the rows or columns you want to ungroup.
- Right-click on the selected rows or columns.
- Click “View more row actions” or “View more column actions,” based on your selection.
- Choose “Ungroup row” or “Ungroup column” from the menu.
FAQs:
Yes, you can. Select the first set of rows or columns you want to group, then hold down the Ctrl key (Cmd key on Mac) and select the other sets of rows or columns. Right-click on one of the selected rows or columns and choose “Group rows or Group Columns” from the context menu.
No, grouping rows does not affect any formulas or data within the sheet. It only changes the way the rows are displayed.
* You cannot group rows or columns that are already hidden.
* Formulas in hidden rows, and columns still work, but the results won’t be visible until the group is expanded.
* It can affect printing large datasets, so preview before printing.
Google Sheets doesn’t offer specific print options for grouped data. However, you can adjust page breaks and print settings to optimize the output.
Unfortunately, there’s no built-in way to customize the appearance of grouped rows or columns.
Breaking down the data into smaller chunks can help prevent issues. You can also try different grouping methods to find the most efficient approach.
Conclusion
Mastering the art of grouping rows and columns in Google Sheets is a valuable skill. It can turn cluttered data into organized, easy-to-navigate information. This functionality saves time and improves the readability of your data, making it easier to analyze and review. Use these grouping techniques to streamline your workflows and make your spreadsheets more efficient. Happy organizing!

