Many of us use Google Drive to store digital files and work with others easily. However, losing data can be a big problem. It’s very important to back up your documents and files to protect them from risks like accidental deletions or cyber-attacks. We’ll show you how easy it is to back up your Google Drive and keep your digital life safe and smooth.
Outline
ToggleHow To Upload Photos To Google Drive?
There are two ways to upload photos to Google Drive, depending on whether you’re using a computer or a mobile device:
1. Upload Photos To Google Drive From A Phone
1. Android
Uploading photos to Google Drive from an Android device is a convenient way to back up your memories and make them accessible from anywhere. Here’s how to do it:
Steps:
- Make sure Google Drive is installed on your Android device. If it isn’t, you can download it from the Google Play Store and log in with your Google account.
- To upload photos, first locate them either in your Gallery app, Google Photos, or a specific folder in your internal storage.
- For uploads from Google Photos or the Gallery app:
- Open the app and choose the photos you want to upload.
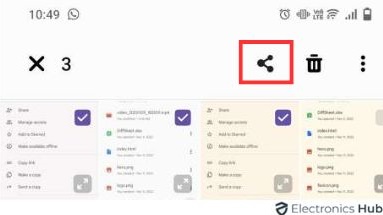
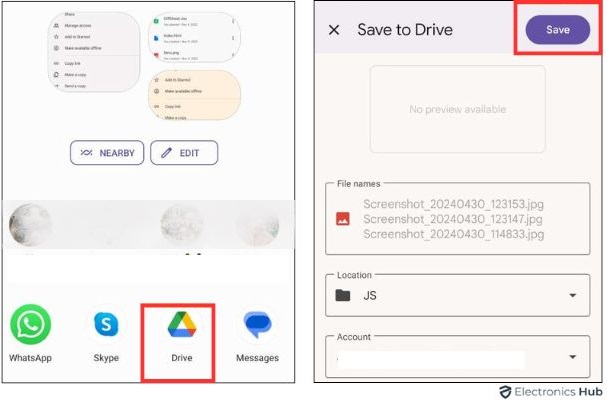
- Click on the ‘Share’ icon and select Google Drive as the destination.
- Choose the folder in Google Drive where you want to save the photos and finish the upload process.
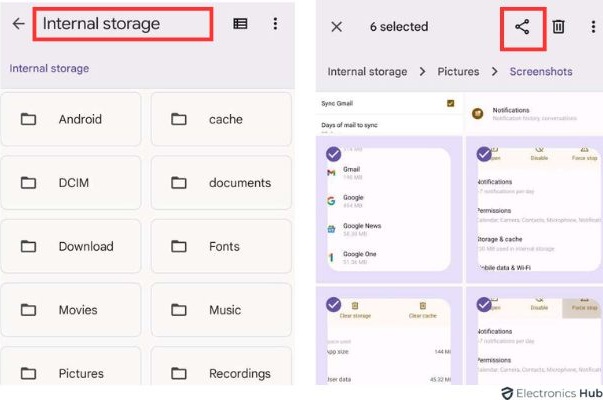
For photos in internal storage:
- Use a file manager app, like Google Files, to access the storage folder.
- Long-press on a photo to begin selecting multiple files, then choose all the photos you wish to upload.
- Tap the ‘Share’ icon, select Google Drive, and determine the folder for storing the images.
These steps will help you efficiently store your photos in Google Drive using your Android device.
2. iPhone
Transferring photos from your iPhone to Google Drive can be done swiftly using the Google Drive app, ensuring your memories are securely stored and accessible from any device. Here’s a straightforward method to achieve this:
- First, make sure the Google Drive app is downloaded on your iPhone and that you are signed in with your Google account.
- Open the Google Drive app and tap the plus “+” icon located at the bottom right of the screen.
![]()
- From the menu that appears, select “Upload.“
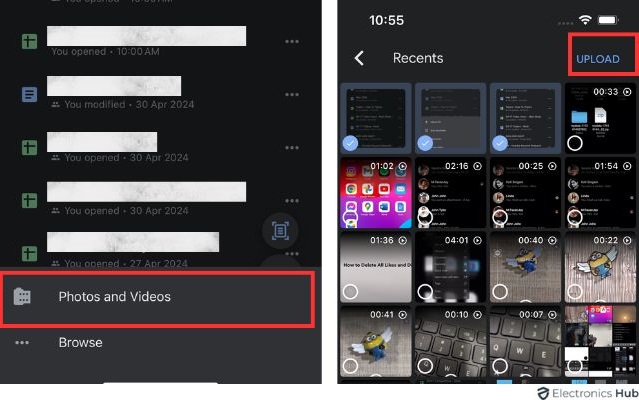
- Choose “Photos and Videos” from the subsequent options.
- You may need to allow the app access to your photos. Once permissions are granted, select the photos you wish to upload.
- Finally, confirm your selection and tap “Upload” to start transferring your photos to Google Drive.
This method provides a direct and efficient way to upload your images, keeping them safe and easy to share.
2. Upload Photos To Google Drive From a Computer (Windows/Mac)
There are two main ways to upload photos to Google Drive from your computer. Here are the methods for the same.
1. Using Web Browser
Uploading photos to Google Drive from a computer is a straightforward process that allows you to store, share, and access your images from anywhere. This method is beneficial for backing up photos or making them available on multiple devices.
Steps:
- Sign in to the Google Drive website with your Google account.
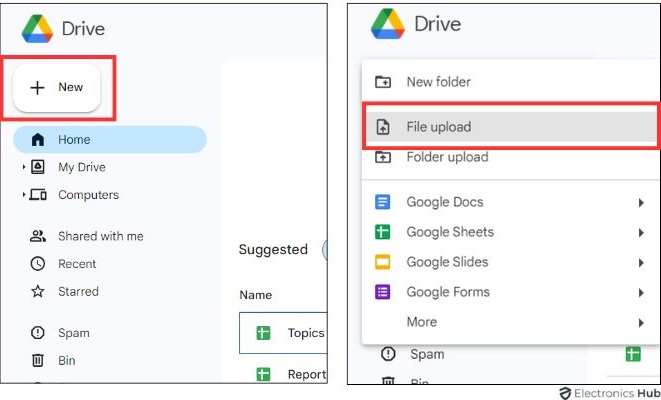
- Click “+New”, then select “File upload” from the dropdown menu to start adding your photos.
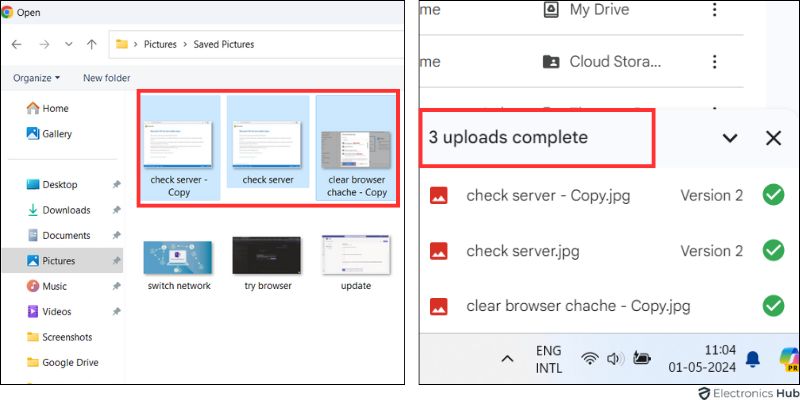
- Browse your computer to find the photos, select them, and click “Open” to begin uploading.
- Monitor the upload process via the progress window that appears in the lower right corner of the screen.
2. Using Desktop App
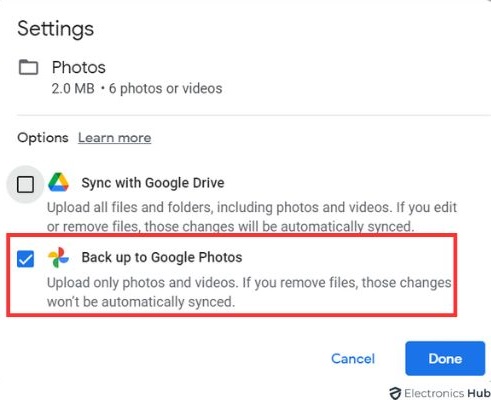
To efficiently store and share photos on Google Drive using a computer, you can utilize either the Google Drive website or integrate Google Drive directly into your system’s file management using the Backup and Sync app.
Uploading Photos Using Backup and Sync App:
To install the Google Drive for Desktop app, open a web browser and access Google Drive.
To set up the Backup and Sync application:
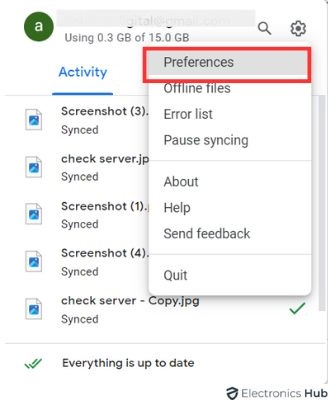
- Sign in with your Google Account.
- Select “Preferences.”
- Select the folder on your computer where your photos are stored for upload.
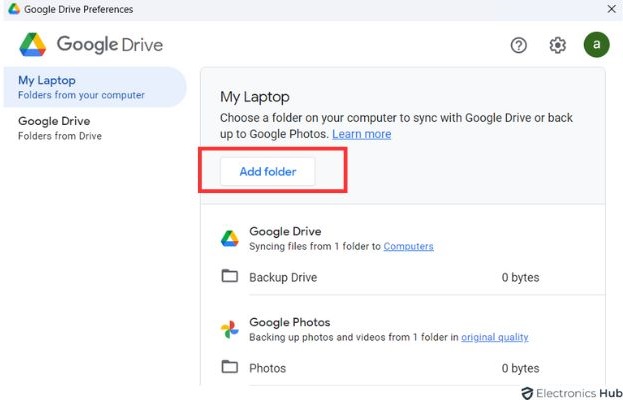
- You may also choose to sync specific Google Drive folders back to your computer.

- Once setup is complete, find the Google Drive shortcut in the sidebar of your computer’s file explorer.
- Open Google Drive in the file explorer and navigate to the location where you want to store your photos; create a new folder if needed.
- Open another file explorer or Finder window, locate the photos, and drag them into the Google Drive window. Backup and Sync will automatically handle the upload process.
How To Fix “Google Drive Upload Failure” Issue?
- Check the Internet: Make sure your internet connection is stable. You can restart your router or reload the webpage.
- Clear Cache: Clean your browser’s cache and cookies. Then try to upload again.
- Disable Extensions: Turn off any browser extensions, especially ad blockers and security tools, to see if that helps.
- Check File Size and Type: Ensure your file is not over 5 TB and is a supported format.
- Google Drive Status: Look at Google’s G Suite Status Dashboard to see if there’s a problem with Drive.
- Contact Support: If these steps don’t work, get help from Google Support.
Also Check:
- How To Move Photos From Google Drive To Google Photos?
- How To Backup From Google Drive?
- How To Download Video From Google Drive?
- How To Copy A Folder In Google Drive?
Upload Photos To Google Drive – FAQs
Ans: Enable the backup feature in the Google Drive or Photos app on your device. Set it to automatically sync your photo gallery.
Ans: While Google Drive doesn’t have a strict limit on the number of photos you can upload in a single session, there are two key considerations:
* Storage Space: Free Google Drive accounts come with 15GB of storage. Uploading a large number of photos may quickly deplete this space. Be sure to monitor your available storage before uploading a significant number of images.
* File Size Restrictions: Individual files uploaded to Google Drive cannot exceed 5TB in size. This limitation is unlikely to affect standard photo formats like JPEG or PNG.
Ans: Open the app, tap ‘Add’, choose ‘Upload’, then select photos to include in your shared link.
Ans: Use Google Photos to back up your images, then delete the local copies from your device storage.
Ans: Before uploading, consider creating folders within Google Drive to categorize your photos (e.g., “Vacation Photos 2024”, “Family Photos”). This helps organize your storage and makes finding specific photos easier later.
Conclusion
Uploading photos to Google Drive is incredibly easy! In just a few clicks, you can save your cherished memories securely. Simply drag and drop your photos into the Drive interface or use the upload button. After uploading, you can rest assured that your photos are safely backed up and can be accessed from anywhere. Go ahead and try it out to safeguard your memories!

